Quantcast
Channel: banaras ka khana
Viewing all 257 articles
Browse latest View live

everyday subzi: guar moongphali ki sookhi subzi | cluster beans and peanuts stir fry

$
0
0


Guar is Cluster beans, also called as guar phali in Hindi. The beans are a developed taste for many but those who like this vegetable, just love it. A lot depends on how you choose the beans when buying as guar can get really hard and fibrous when you pick up mature or stale beans from the market. Look out for slender beans that are tender to touch and shiny in appearance. Guar phali can cooked in many ways, you can stir fry them with chilly garlic paste to make lasuni bhujia or cook them with eggplants with loads of garlic and some hing. A dry curry of guar beans made using a sesame powder is one of our favourite too. Guar dhokli I discovered later and became a favourite too.

Now you know how much I love cluster beans. You can imagine how happy I was to find a quicker way to cook this vegetable and that too when the husband reported that he liked the subzi in his lunch box. This is a sookhi subzi that borders on the territory of a 'stir fry salad', I found it one day on Anita's facebook timeline when she was cooking it and posted a picture. I was so curious I cooked (actually tossed) this curry the very next day and loved it. She later posted this recipe on her blog as well.

I have cooked this one a few times since then, once I added a little shallow fried dry shrimp too, like in this long beans recipe with sambal belacan. But I realised I liked it with peanuts and garlic only, with varying degrees of chilly heat depending on my mood and the summer heat we are living in.


Oh yes, and the recipe involved boiling the chopped guar and mixing it with a coarse powder/paste of the roasted peanuts, garlic and red chillies. Just that.

ingredients

chopped guar (tender cluster beans) 2 cups
roasted peanuts 1/2 cup (or as per taste)
garlic cloves 5-6 (or more if you like)
dry red chillies 3-4 (adjustable)
sesame oil (or any oil you like) 1 tsp
salt 1 tsp

procedure

Add the salt to a cup of water and bring to boil. Dunk the chopped guar in the boiling water and wait till they change colour, it takes about 4-5 minutes for tender guar. Keep the lid on while cooking. Drain and keep aside.

Lightly fry the garlic and chilly in hot oil. Take them out and pound them along with roasted peanuts in a mortar and pestle or in mixie jar, make sure the paste is really coarse.

Mix the paste with boiled guar and serve as desired.

We loved it mixed with plain boiled rice. Peanuts were a bit generous in my recipe so I decided that this will be our simplified balanced meal.

When the peanuts are lesser, I like to add a boiled egg to my plate.


Try this recipe at least once even if you don't like guar. I am sure it will convert you for life. Guar mugphali ki subzi is here to stay in my kitchen for sure.


Everyday subzi: Lau-er shukto or lauki ki doodhwali bengali subzi

$
0
0


Bottle gourd is Lauki in Hindi and it is one of my favourite vegetables. Tender bottle gourd is a delight to cook and eat in summer days and I try and include loads of this gourd for my everyday meals. Finding tender bottle gourd can be cumbersome if you don't know how to choose the tender ones, check this post if you want to know how to choose tender lauki for better tasting lauki ki subzi. Even for this lau-er shukto the tender lauki is best to use. If you are stuck with a hard and mature lauki you better make a raita.


This lau-er shukto recipe looked delicious when I first saw it on a Bengali recipe forum on facebook. So much so that I cooked it almost the next day and was so delighted by the delicate taste of this curry that I ate the entire potful all by myself. The recipe was shared by Dipta Maitra and I have made minor adjustments to suit my taste. He jokingly accused me of harassing the recipe when I suggested I might add paneer to make it a complete meal for myself. I wouldn't mind this punjabification of shukto you see.

According to the discussion about shukto on the Bengali recipe forum, shukto is a curry that includes some bitter taste like karela, bramhi leaves or methi seeds, some ginger paste added in the last and some green chillies. Never to add red chillies and turmeric powder to shukto I learned. I am not complaining.

ingredients 
(2 servings but it made a full meal for me)

one whole medium sized lauki (about 400 gm)
milk 250 ml
salt to taste
ghee 1 tsp
fenugreek seeds 1/2 tsp
green chillies broken 2
fine ginger paste or ginger juice 1 tsp or a little bit more
roasted mustard powder 1/2 tsp (can be roasted quickly and powdered in mortar and pestle)

procedure

Peel and cube the gourd in large sized cubes.
Add the lauki cubes in a pan (kadhai) along with 1/2 cup of water and salt and cook on low flame for about 10 minutes.
Add the milk and cook on medium heat till the vegetable is cooked well.
Now heat the ghee in a ladle and tip in the fenugreek seeds in it. Let the fenugreek seeds get browned and aromatic and pour this hot mix into the cooking curry.
Next to add is the broken chillies and ginger paste. Mix well and simmer for a couple of minutes.
Finish with roasted mustard powder and serve immediately.

This subzi would tempt you to consume more vegetables in a tastier way. So go ahead and cook some lau-er shukto for yourself now. The best suitable accompaniment to this lau-er shukto is plain boiled rice.


I tried this milky lau-er shukto without the roasted mustard powder too and liked it both ways. The interesting thing is, as much as I loved this delicately flavoured milky lau-er shukto, Arvind refused to taste a milky curry as he thought he wont like it. His loss completely.

There is very mild bitterness of methi in this delicate curry and that tastes really interesting. Ginger imparts a lovely depth and roasted mustard powder was a surprise for me in this milk based curry. I actually added more milk than usual and loved the way milk incorporated the flavours of the frugal spices.

May be Arvind would also come around to some lau-er shukto next time I cook this as I am going to repeat this many times now. I even tried it with tinda (apple gourd) but it was not as good as the lauki version. I will keep making the original version of lau-er shukto for sure.

everyday subzi: bhein ki besan wali subzi | lotus stem curry in a chickpea flour gravy

$
0
0


Lotus stem is called Bhein or Kamal kakdi in Hindi. It is an aquatic vegetable (underwater stem of Lotus) that tastes great whatever way you cook it. I find it to be great for salads, stir fries and curries, very versatile in it's use. Lotus stem is a nourishing vegetables and helps improve hemoglobin count immensely. Abundant Vitamin C helps availability of the minerals (Iron Copper, Zinc, Magnesium), a good range of Vit B complex helps control nervous irritability and an optimum sodium-potassium ratio (1:4) makes this vegetable ideal for electrolyte balance. More nutritional information here.

This bhein ki besan wali subzi was originally shared by a facebook friend Kapil Bahl and I knew I would love it as soon I saw the recipe. I love simple recipes that cook fast and taste great, I adapted the recipe to suit my taste and ease of cooking of course.

This recipe makes a good accompaniment to roti or rice in Indian everyday meals and makes a nice side dish even in elaborate menus. I personally have loved this curry as a stand alone meal mostly. By now you must know I eat my vegetables as my meals.

ingredients
(serves 2-3)

lotus stem 300 gm (peeled cleaned and sliced)
chopped onions 1/2 cup
minced garlic 2 tsp (or less if you don't like garlic much)
minced ginger 1-2 tsp or as per taste
whole dry red chillies 2-3 broken
chickpea flour (besan) 2 tbsp
turmeric powder 1 tsp
everyday curry powder 2 tsp
salt to taste
mustard oil 1 tbsp

preparation

Boil the sliced lotus stem wit a cup of water and salt (I pressure cooked till the first whistle blew), reserve. This boiled lotus stem can be refrigerated till required, stays well for a couple of days.

Heat the oil in a kadhai and tip in the dry red chillies, add the minced garlic and chopped onions one after the other and fry till translucent. Add the powdered spices and besan and fry for a couple of minutes or till the mixture gets aromatic. Add the minced ginger and the boiled lotus stem along with the water and mix well.

Add more water to get required consistency of the curry and simmer for about 5 minutes. Serve ot wit or witout a garnish of copped dhaniya patta (coriander greens).

This curry is a light yet filling dish that can be had with a little rice added to it or as it is like I have it mostly. Bhein ki besan wali subzi tastes great even as a leftover or as a lunch box meal with roti or paratha. Arvind liked it in his lunch box and I make a little dry version of bhein ki besan wali subzi too so it can be packed into the lunch box as well.

This kind of besan wali subzi is made using boiled chickpeas, boiled green peas, boiled gatte or even leftover pakodas too. Try cooking this easy curry with any root vegetables you like and I am sure you would love it too.

everyday subzi: kumaoni palak as they make it at Te Aroha

$
0
0

I have been loving this kumaoni palak subzi they serve at Te Aroha. I ask for this spinach stir fry almost everyday for one of my meals whenever I visit here. There is something the way onions are added to this dry stir fry and the way whole coriander seeds make a crunch in the mouth. This would be the simplest spinach stir fry with very clean flavours that can be a part of any cuisine if you ask me. I wont mind a cheese sandwich stuffed with this spinach stir fry if I am having a sandwich, though I don't remember when I had my last sandwich.

ingredients
(2 servings)

spinach (chopped roughly, steamed lightly) 2 cups packed
diced onions 3/4 cup
whole coriander seeds 1 tbsp
whole dry red chillies 3-4 or more if you like
mustard oil 1 tbsp
salt to taste

preparation

Heat the oil in a pan and tip in the whole red chillies and coriander seeds and let them crackle.

Add the onions and stir fry for a minute or till the onions get translucent.

Add salt and spinach and stir fry on high heat for about 5 minutes or till the spinach looks dry.

Serve hot with meal of your choice.

I like this spinach stir fry with daal or rajma and ragi roti or multigrain roti but you can pair it just with anything you like.

Kumaoni palak will be repeated very frequently in your kitchen I am sure.


everyday subzi: turai aur paneer ki subzi

$
0
0

Turai is sponge gourd, a staple summer squash that I end up cooking a lot. This is one of those vegetables that even Arvind loves so I can do many versions of it. This paneer turai ki subzi was made to suit his lunch box meals, to make the curry protein rich and filling with multigrain rotis that he liked for his everyday lunch box. But the greatest convenience is the ease of cooking in the morning rush hours. You get the drift.

Many a times I add a paneer salad or egg bhurji or just sliced boiled eggs smeared with pesto, mustard or mint chutney along with some green vegetables but if he is having eggs for breakfast and I have no time for making a salad I add paneer or shredded chicken to his subzi. Works well because the same subzi or salad serves me for my brunch later in the day. This is the story on most weekdays with just a change of the vegetables used.

Now a days as work load is getting more, the vegetables are cut by the maid most of the times though I do all the cooking myself, the vegetables come out of ziplock bags when I cook.

ingredients 
(2-3 servings)
peeled and sliced turai (ridge gourd) 4 cups or 700 gm approximately
sliced onions 1/2 cup or one medium sized onion
slit green chillies as per taste
cumin seeds 1 tsp
turmeric powder 1 tsp
cubed paneer 100 gm (3/4 cup)
mustard oil or any oil you like 1 tbsp

procedure

Heat the oil and tip in the cumin seeds. Add the slit green chillies once the cumin seeds crackle. Immediately add the sliced onions as well and stir fry till they get slightly pinkish.

Add the turmeric powder and mix well, add all the sliced turai and mix well again while the veggies wilt a little bit.

Add the salt and cook covered till the turai wilts completely and leaves it's juices. Add the cubed paneer and mix well. Let the curry cook on high flame without the lid for a while till the extra liquid evaporates.


Serve as required. This curry has a sweetness to it due to the onions and the natural taste of the sponge gourd. You can add a little more green chillies than you normally have and even a little chopped ginger if you wish. Some tomatoes also make sense if you want the flavours a bit hot and sour type. This recipe makes the curry a little on the sweeter side with just a mild hit of chilly heat which we have grown up eating in the Eastern UP homes.


everyday subzi : a lotus stem dopyaza and how spices are included in summer meals...

$
0
0


Lotus stem is one vegetable vegetarians like a lot. Called as bhien, nadru or kamal kakdi in local parlance, it is the under water stem of the lotus plant. Very nutritious and very tasty, although sometimes it is difficult to clean it from inside but those who love it just get it done anyhow. This dopyaza will remind you of the chicken or mutton dopyaza that is cooked in many UP homes.

Using lot of onions and some whole spices is a popular way of using spices in hot summer months. This way the curries remain light, the quantity of onion balanced the spice heat and the curry doesn't feel too hot in summer heat. The plains of UP get quite hot in summer months and it lasts till the monsoons make the whether a bit pleasant.

Lotus stem can be cooked almost like meats and if you use the same spices the resulting curry is actually comparable to meat dishes. Obviously if you want to get the taste of meat you will be disappointed but vegetarians wont miss anything. In UP vegetarian homes whenever people want something special, that is apart from he usual green vegetables, they turn to jack fruit, lotus stem or some of the koftas that are made with much fanfare. Many types of besan ki subzi is also made for those who detest vegetables. A special dry gatte ki subzi is peculiar to Banaras and I am yet to post that one. Paneer is almost an everyday affair in most homes since I remember but elders say that paneer was not so common in older days.

Even lotus stem makes good koftas but somehow I never make koftas as I don't find them worth the time and effort. This blog only has one kofta recipe that was posted because that kele ka kofta had become the talk of our extended family when I had made a brave effort to cook them at a special occasion. I remember my mother used to love bhien ka kofta quite a lot.

This dopyaza is one of the curries that remind me of my childhood. Actually there are very few that I cook as most of them use a lot of oil and frying so I avoid them. Not just for being heavy, they require more cooking time as well. Dopyaza fits the bill. Kathal ka dopyaza is one of the most popular recipes on this blog.

So how do you cook bhein ka dopyaza? Not complicated at all.

ingredients
(2-4 servings depending on other side dishes served)

peeled and diced lotus stem 2 cups (about 200 gm)
sliced red onions 1.5 cup
whole dry red chillies 3-4 (broken if you want the curry hot)
black cadamoms 2
green cardamoms 4
cloves 4-6
cinnamon stick one inch piece
whole peppercorns 1 tsp
salt to taste
turmeric powder 1/2 tsp (many people omit turmeric powder)
mustard oil 2 tbsp (or a bit less if you can manage cooking the curry on really low flame)

Procedure

Heat the mustard oil in a pressure cooker pan or a thick base kadhai.
Tip in all the whole spices and let them sizzle for a few seconds but don't let them splutter.
Add the sliced onions, salt turmeric powder if using and the diced lotus stem all at once. Toss a few times to mix everything well.
Cover the lid and let the curry cook really slow at very low flame for about 30 minutes in a kadhai or just put the pressure cooker lid if using the gadget and pressure cook till the first whistle blows.

Let the pressure release on its own, serve hot as desired. We used to love this with paranthas in our childhood but now it is more of multigrain roti or sometimes a plain flaky crisp parantha with it.

It is another matter if I cook besan wali bhien ki subzi. That I can eat all by itself.


experiencing Dehlvi cuisine at threesixtyone at The Oberoi Gurgaon : a journey steeped in tradition

$
0
0

Tracing the roots of traditional cuisine of Delhi is not an easy task. Cumulative culture of Delhi was made by a succession of rulers coming in from diverse places and their influences on the local inhabitants. There have been Moghals, Punjabis from the north west frontier, Kayasthas, Marwaris and Jains influencing each others cuisine peppered by the vast variety of spices and fresh produce coming to this market place that Delhi is. The accumulated diversity in the food culture over the century makes Dehlvi cuisine. But you just can't fathom it so easily.

Purani dilli (old Delhi) is still preserved in the past because most old families of Delhi still have some residents there and the food and spice markets have survived, though we see some signs of the blind race to 'development' there as well. You would get Khas ki jad (Vetiver root) and Paan ki jad (Betel root) a bit after searching, good old traditional taste of bedmi alu and nagori halwa more easily and all seasonal fruit very very easily being carted freely on the streets just like old times. But you have to have that eye to look for tradition and history if you are walking through lanes of old Delhi else it just looks like a maze of rickshaws, hanging wires and pushy cartwheels.

How would Dehlvi cuisine be when brought to a posh five star hotel? I was wondering about the same question when I heard Chef Dirham Haque's long research on this subject and his rendition of this centuries old cumulative cuisine at The Oberoi Gurgaon. It was an absolute delight when we went to taste the Dehlvi spread laid out at a huge round table at threesixtyone and had a detailed talk with Chef Dirham Haque and Chef Ravtej Nath who has curated the Dehlvi menu.


They brought the spices on the able first, all sourced from spice vendors and haqeems (Unani and Ayurvedic practitioners) of Khari Baoli area in old Delhi, I have never used mica and nagkeshar in my home cooking and it was great to have a feel of the aromatic spices before we started the elaborate lunch. I am definitely going back to khari baoli really soon and get my spices.


While we were discussion spices a welcome drink came that looked excuisite and smelled heavenly. This is called Mufarra which is made using extracts of vetiver, flowers and some ittar (a blend of aromatic oils). This was so sweet I could not have more than a couple of sips, but kept bringing it to my nose to have a whiff of the past centuries.


The aperitif was a known dish, the dahi bada which is called dahi ki gujhia but not like banaras wali dahi ki gujhia. This dahi ki gujhia has no stuffing but shaped like half moon that is traditional for gujhia. It was well made and nicely presented but it made me miss the banaras wali dahi ki gujhia. I might make it soon sometime.


The platter of kababs was a sight. Five assorted kababs would make a full meal and more. And here I tasted all of them.


Clockwise from top is a succulent and mildly spiced chicken tangdi kabab from punjabi origin, a green peas kabab (stuffed with hung curd) from marwari community, a silbatte ka kabab stuffed with hung curd, methi ka dhoka in the middle is a delectable mutton kabab covered with fenugreek leaves to give an illusion of vegetarian kabab. The melt in the mouth gilawat ka kabab was the best gem on the platter that was polished off completely. I liked the onion ring salad with cucumber tomato and slices of sweet mangoes quite well.

Jamun sorbet was the palate cleanser and wowed everyone. Smooth chilled jamun puree half frozen half melting and really delightful.


The main course started with murgh musallam. It came with a rich gravy of nuts and aromatic spices. Murgh musallam is tough to do if you ask me, I have never attempted a full chicken in my oven as I know some parts of the chicken get tough when roasted whole and it is not one of my favourite dishes honestly. This one was done well and we were told this used to be a part of the 'Farmaishi khwan' in older times. Farmaishi was 'on demand', cooked occasionally hence rich.


'Saadgi khwan' was the everyday food. Nalli nihari is the best example of Mughlai saadgi khwan, slow cooked meat on bone is served with khameeri roti for breakfast for the common man who has to work hard during the day. Nalli nihari is nourishing food and oh so yum.


I love ginger, green chilly and coriander greens over it. I had to taste just one spoon from all these as it was difficult to eat anything more. So many things to taste to got through the journey of Dehlvi cuisine.

I liked the tinde ka bharva stuffed with keema. Soft tinda (apple gourd) stuffed with mildly spiced mutton mince and covered with rich and creamy gravy.


All this was polished off using bits of this flaky layered naan crusted with almond slivers and called naan e bakumach. Farmaishi khwan had to have some special naan as well. Khameeri roti was to accompany the everyday (saadgi khwan) nihari.


I tasted matar ka paratha and it was done really really well. This was like we have tasted in out marwari friend's homes, associations with food never fade.


I loved the mutton biryani and a vegetarian nimona ki biryani which had green peas stuffed whole green chillies in it. Very interesting flavours but I just had a small spoonful as there was no scope for more food.

We tried kunni daal which is cooked in earthen pots for long hours. The paneer dish everyone loved was a layered paneer lavanglatika with a rich gravy. Amrood ki subzi and bharva karela  were clear winners among the vegetarian spread. There is no comparison of vegetables when cooked well and these dishes proved it rightly. We just took bites from the meat dishes and polished off all the bharva karela and amrood ki subzi.

Desserts were from another world it felt. This creamy dessert somewhere between a mousse and souffle topped with mango cubes and pomegranate seeds, pistachio dust and gold leaf is called royal fruit cup and has some custard, whipped cream, smooth rabdi and small bits of rasgulla in it and was really good.


No one could finish this delectable dessert as the serving was just too big.

This kulfi khaas madhubala dehlvi was a favourite of actress Madubala who belonged to Dehlvi clan. Nicely done kulfi but not my favourite.


The most exciting dessert was this dabba ice cream. Dabba is a contraption for hand churning the ice cream that was used in olden times. A metallic container with fruit pulp and reduced milk etc is kept inside a wooden case lined with ice cubes and salt (to make the ice last longer) and the ice cream is churned using a lever.


The finished ice cream looks like this. Still inside the dabba.


And on the table. Taste of dussehri mangoes made richer by reduced milk and churned by hand. What pleasure. This ice cream was called as kulfa in Banaras I got to know recently while talking to a septuagenarian.


Quite an experience it was. We left with our fingers smelling of vetiver thanks to handling all the spices that were displayed. Aromas of the mufarra kept coming back even though I am allergic to strong smells. Real aromatic oils of spices and flowers have some magic in it.

Blogger friend Ruchira had brought us all together for this wonderful journey. I met Deeba, Parul and the tea lady Anamika too. Mallika Dasgupta ( Manager-Communications at The Oberoi Gurgaon) played a great host as we chatted with Chef Ravitej Nath and Chef Dirham Haque. What a memorable day it turned out to be.


the perfect recipe of kheer | 10 ways to make your own favourite perfect chawal ki kheer

$
0
0

Kheer is the Indian rice pudding, the most common dessert we used to enjoy in our times. Now a days the most common dessert seems to be a slice of cake or a brownie but kheer ruled my childhood. Chawal ki kheer or this rice pudding was almost an everyday affair in many families I know but in our home we did not eat much meetha (desserts) everyday so kheer was made about twice a week or so. The special occasion kheer used to be a little rich with more nuts, slow reduced milk till it turns pinkish and saffron etc used to be added to the special occasion kheer. The everyday kheer would be cooked and reduced for lesser time for convenience and a few nuts would be added because everyone loved the occasional bite of cashew and almonds. Oh and we loved the plump raisins so much in our kheer.

The everyday kheer would sometimes include some chopped dates or grated coconut or some grated carrots for colour but it was certainly lighter than the occasional festive kheer. The question is, which one was the best kheer out of these?

The best kheer recipe differs from person to person. Some people like the rice just cooked while some people (like me) like the rice almost completely dissolved into the milk making it more creamy and smooth. I remember one of my bong friend used to reduce the milk to almost rabdi consistency and then add the rice so the rice just cooked in the remaining water left in the much reduced milk. The resultant kheer used to look like halwa with whole rice grains sticking out and she loved it that way. I could never associate that dessert with kheer though. The rice in my kheer has to be dissolved to creaminess. That makes my kheer perfect. Always with short grain rice.


Some people would like more nuts and some aromatic spices like cardamom, nutmeg or cinnamon in the kheer while some like it with rose water or kewda water (screw pine extract). British picked up our kheer and flavoured it with vanilla and what not but even that rice pudding is the best when the rice disintegrates after slow cooking. The baked versions are not just the same.

I am listing a few ways to achieve what you want in a kheer. To get your kind of perfect kheer to enjoy.


  1. If you like the kheer really thick and the milk caramelized to pinkish brown, reduce the milk with patience for hours. The rice will be added in the very beginning if you like the kheer creamy and the rice grains disintegrated into it and add the rice half way though it if you like your rice grains intact into the kheer.
  2. If you like the nuts crunchy or with a bite add them as a garnish. You might like to fry them in ghee for added flavours. But if you like the nuts to soak up and become a part of the creaminess, add them along with the rice and milk together. Same way, if you like the raisins plump and juicy add them while the kheer is reducing, else add chopped raisins as garnish only.
  3. Use whole milk for perfect results. Skimmed milk would give you half hearted results.
  4. Always add sugar in the last when you see the kheer has reached the consistency you want and the rice has achieved your kind of texture in the kheer. If sugar is added early it doesn't allow the rice to disintegrate, the way I like it. The sugar makes the kheer a little thinner just after adding and the kheer needs to be reduced a little more after adding the sugar.
  5. You can add powdered cardamom or nutmeg along with the sugar to allow the flavours to stay in the kheer. The aromas escape if you add these spices in the initial stage of cooking kheer. Avoid adding whole cardamoms in the kheer unless you like to chew on them in between spoonfuls of kheer.
  6. Do not add too much rice to the quantity of milk you are using. The bulk or number of servings of the kheer depends on how much milk you are starting with and not the amount of rice. No more than 2 tbsp rice per kilo of whole milk is the rule to follow.
  7. Always use good quality aromatic rice. Some people like basmati rice for kheer but I like the small grain gobindbhog or kala namak variety of aromatic rice for my kheer. Keep the sugar minimal so the flavours of the rice take center stage. Don't add too much cardamom or nutmeg to kill the fragrance of rice too.
  8. Never make the kheer too sweet. It kills natural sweetness that comes by caramelisation of reducing milk and the fragrance of rice. Add sugar little by little, taste and add more if required.
  9. Always cook the kheer on very low heat once the milk had reduced to half. The milk and rice mixture tends to stick to the bottom while cooking and get burnt. This makes the kheer really awful if it happens. Cooking the kheer in thick base vessel helps. Stirring frequently helps too.
  10. If you like the kheer warm make sure you serve it with minimal cardamom or nutmeg as these spices can be overpowering at warm temperature. Cold or chilled kheer arrests the fragrance of these spices so you might need to add a bit more of them.

Here is the recipe of my favourite way of making kheer. The everyday kind of kheer that is not too heavy.

ingredients
(for 5 small servings)
small grain aromatic rice 2 tbsp
whole milk 1 Liter
sugar 2 tbsp (or more if you like)
green cardamom powder 2 pinches
mixed chopped nuts as required

procedure

Mix the rice and milk together and cook on low flame, stirring frequently till the kheer reduces to your preference. The rice should get cooked so much that it almost disintegrates in the reduced milk.

Add the sugar and cardamom powder and reduce a little more. You can add more milk at this time if you want and reduce some more to make the kheer a bit rich. You can add saffron or raisins at this point too. Follow the instructions listed above if you have any of those preferences.

Garnish with nuts, chill or have the kheer warm as I like it sometimes.


You might like this sheer brunj or biranji if you like your kheer really rich. This parippu pradhaman will be a delight if you like this Kerala delicacy. This sevaiyyan kheer used to alternate with chawal ki kheer in out home. And the sama ke chawal ki kheer was made for navratri fasting.

There were sooji ki kheer for quick dessert and phirni for a quick but richer dessert sometimes. I intend to share those recipe too sometimes. Let me know if you find these tips on making the perfect chawal ki kheer useful for you. This is all I learned cooking kheer for the family for over 3 decades now.


mung ka dhokla recipe

$
0
0

Mung or moong ki daal is skinned mung beans considered very easy to digest and fairly rich in protein. Mung ka dhokla is a steamed bread that is served cold with a tangy hot and sweet tempering that makes the dhokla quite moist and soft. Actually I would say all types of dhokla are basically steamed lentil breads way more superior than the white commercial breads. Very similar to corn breads of Mexico but served differently. The Indian punch is unmistakable in a dhokla which is specifically a Gujrati riot of flavors.


 Besan ka dhokla is more common in our homes and most sweet shops all over north India. Everyone likes the dhokla with varying combinations of sweet, sour and hot flavours melding together with some coconut, sesame and mustard seeds in the tadka. I avoid sesame most of the times although I love sesame otherwise. May be because I grew up loving the dhokla without sesame.

Mung ka dhokla is not very common but I started making it quite by an accidental lie I had to speak. Yes I do lie sometimes but I always have valid reasons for it. The valid reason for this lie came in the form of an unexpected query about the usual besan ka dhokla I had made one day. This was at my in law's place and I was a new bride on a spree to impress everyone with the things I could do. So the dhokla that day was appreciated a lot and after eating a few fat pieces of dhokla my father in law asked if those were 'mung ka dhokla'. I was startled at this question as I had got to know he can't digest besan that well and he had already eaten a lot of dhokla for my comfort. I said yes it is moong ka dhokla just to not panic him. He did not have any indigestion issues that day thankfully but then he started demanding for mung ka dhokla quite often. Later on I made the real mung ka dhokla but I wonder how could he not know the taste the first time.

This time when I visited my in laws for an extended weekend I was reminded of how he wanted mung ka dhokla last time I had gone and I could not make it then. I had time on hand this time around and made this one dish for everyone to enjoy.


There are special utensils for steaming dhokla but not to worry if you don;t have them. Keep a large vessel ready to boil water over which a metallic strainer will be placed. The dhokla will be steamed in a flat based thali (or large baking dish) kept inside the strainer and covered. You can steam dhokla in idli steamer as well.

ingredients 
(makes enough dhokla for 6 people as a hearty snack)

mung daal (skinned mung beans) 2 cups
salt to taste
soda bi carb 1 tsp
peanut oil 1 tbsp
mustard seeds 2 tsp
slit green chillies 3-4
curry patta 3-4 strings, leaves separated
grated coconut 1/2 cup packed
lime juice 2 tbsp
sugar 1 tbsp
hing or asafotida 1 pinch

procedure

Soak mung daal overnight and grind without added water the next morning. Soaking the mung daal for at least 4 hours is required so keep it ready if you need it in the evening. The paste should look like idli batter or loose cake batter in consistency.

Add salt and soda bicarb and mix really well. Pour the batter in one or 2 greased thalis depending on how large your steaming vessel is and how thick (tall) dhokla you want.

Place on the steamer contraoption and steam for about 15 minutes or till a knife comes out clean.

Cool and make cuts into the steamed dhokla. Prepare a tempering to pour over it.

To make the tempering, Heat the oil and add hing to it. Now tip in the mustard seeds, green chillies and curry patta and let them cook a bit. Now pour 1 cup of water and add sugar to the mix. Let the mixture come to a boil before taking it off the flame. Add the lime juice and pour over the steamed dhokla. Let it rest till the dhokla soaked up all the water and tempering. Serve as desired, garnished with grated coconut.


This dhokla stays well for 8-10 hours on room temperature. I like mung ka dhokla better tha the besan ka dhokla that I make at home. I think mung ka dhokla has it's own taste that grows on you. But Arvind likes the besan ka dhokla better. We rarely have common food choices you know.

I suggest making thinner dhokla when making it with mung daal as the rising is better this way. Or else you can add a tsp of fruit salt to the batter to make it rise more.


pyaz ka raita aur arbi ki sookhi subzi | onion yogurt raita and colocasia curry with coriander greens

$
0
0


Pyaz ka raita used to be a favourite in our childhood days. I am not joking. I know many people whose most favourite raita would be boondi ka raita and most Banaras families made the best boondi ka raita I have ever tasted anywhere else. That boondi ka raita used to be a little sweet and sour and a very little hot. Raita is considered the digestive condiment served with the first course of meals and more serving are had till the end of the meal. For some people using any vegetables in a raita is blasphemy but I somehow always loved the ones with vegetables in some form or the other.

This pyaz ka raita used to be different from all the other raitas that were made at home. This was the one where the dahi (home made yogurt) will be thinned down a little bit and the raita would be a little runny. All the other raitas will be thick and creamy but not pyaz ka raita. And this was the only raita where the vegetable (onion in this case) would be fried till pinkish brown and then mixed with thinned yogurt. Other vegetables were just grated and added raw to the raita (like cucumber, carrots, radish etc) or were cooked or steamed (spinach, bathua, grated lauki etc) and then added to the raita.

Now you know this raita used to be a little different in all aspects. The roughly chopped onions will be shallow fried in mustard oil with a few tempering ingredients and the extra oil would always float on the raita. Now I make it low oil but my mom's version still has a layer of oil floating on the surface.

ingredients..
(2-3 servings)
roughly chopped red onions 3/4 cup
scissor cut dry red chillies 2 or to taste
hing (asafotida) 1 pinch
cumin seeds 1 tsp
chopped curry leaves 1 tbsp or more
mustard oil or any oil you want 2 tsp
salt to taste
black pepper powder to taste
yogurt 1 cup
water 3/4 cup

procedure..

Heat mustard oil in a pan and tip in the hing and cumin seeds and let them splutter. Now add the cut red chillies, chopped curry leaves and then the onions. Add slat and fry the onions on low flame till they get pinkish brown.

Let the mixture cool down. Then whisk the yogurt and water together and add the fried onion mix to it. Add pepper powder and mix well. Serve at room temperature.


This pyaz ka raita used to be always accompanied with some sookhi subzi. We used to eat a lot of parwal ki bhujia, kachhe kele ki subzi, arbi ki sookhi subzi or beans cabbage or cauliflowers cooked with minimal spices.


This arbi ki sookhi subzi is cooked with loads of green coriander leaves and some dhaniya-jeera powder or all blended into a paste together. I like the later version for its convenience and better aromas.

ingredients of arbi ki sooki subzi
(3 servings)

boiled and peeled arbi (colocasia or taro roots) 250 gm
chopped coriander greens with stems 1.5 cups
coriander seeds 2 tsp
cumin seeds 2 tsp
green chillies 2-3
chopped ginger 1 tsp
chopped garlic 1 tsp
turmeric powder
mustard oil 1 tbsp
salt to taste
lime juice 2 tsp

Procedure..

Chop the arbi in roundels. Keep aside.

Blend together all the whole spices and chopped ginger garlic and green coriander leaves. Make a coarse paste. Keep aside.

Heat the oil in a thick base kadhai and tip in the hing and wait for a couple seconds to infuse the hing in oil. Add the green paste and fry till it gets aromatic.

Add the arbi roundels and fry well, occasionally turning them. The arbi should absorb the flavours of the green spice paste.

Add lime juice and mix well. Serve hot or on room temperature. This sookhi subzi is a good option for lunch boxes too.


We enjoyed this meal with multi grain kasoori methi parathas. This was a lavish (read heavy) Sunday brunch one day. We normally have only this kind of meals on Sundays and a very light early dinner.

The arbi ki sookhi subzi makes the whole meal for me sometimes. I love it sometimes if not always.


the new Al Karam at Satya Niketan : whipping up old Delhi food with a new fervor

$
0
0


Food from the streets of Old Delhi is not just food in the physical sense. It is a tradition that has lived on and evolved over generations. It is the root stock for the modern fusion cuisine, infusing flavours into new techniques of cooking and new ingredients may be. But the old school cooks of old Delhi still cook their food the traditional way, the spices are milled and ground and the meat is cut and pounded exactly the way it was done a century ago, or even before.

You would feel the honesty in the food once you take a bite. And that happens when you eat at Al Karam. The original Al Karam is located in the Matia Mahal street but somehow it couldn't catch up with the magnanimous popularity of it's neighbors Karim's and Al-Jawahar. Al Karam got a new lease of life when a young restaurateur gave them a chance to showcase their food at Gurgaon (DLF phase 4 market) and now at Satya Niketan market too. The food and portions at the Satya Niketan market is made to suit young students and families both. They have two separate menus for students and others. I found the newly opened Al Karam at Satya Niketan quite basic yet peppy in it's energy.


They have introduced a few exotic dishes like roast Quail and Emu but the cooking methods are traditional.

While the food is heavy and rich, you don't feel too stuffed if you keep your portions under control. The gilafi kabab was as good as we had tasted last time. These foods keep calling you back to them.


We loved this Quail roast so much not just for the taste but for how it looks. That tiny little bird swimming in a butter rich sauce. This is the first time I 'liked' quail by the way.


This Butter cream chicken was good. I was reminded of how we have seen people almost drowning in huge bowls of this butter cream laden chicken in Matia Mahal, all polished off with roomali roti. This one was a close imitation of the original, I think the curd used was a little bit too sour. I am sure they would have taken care of it by now.


This Hakeemi chicken was something I was tasting for the first time and it was good. With hints of fenugreek and ginger, the creamy gravy is laden with nut paste as well. Quite a balanced bouquet of flavours.


 Umm...and the haleem is so yummy too. We are planning to get haleem packed from there sometime soon. We have had better haleem than this but Al Karam haleem is quite good on it's own too, robust and yet light.


Robustness you have to see in the buff nihari they serve. I think they serve mutton nihari mostly and the buff nihari is served on request. We loved every bit of it although we have had better nihari with marrow thrown into it in the streets of Nizamuddin.


The best thing we tasted was the roasted duck. This is something I would call the signature dish of Al Karam Satya Niketan. Very well cooked moist pieces of duck, charred well and the spice coating is so well balanced too.


This is one of those dishes I would be reminded of whenever I would dig into some duck. Did I tell you I don't normally like duck much :-)

Doused in old traditions the dusk gets a new makeover. Although the makeover could not do much to Emu meat. I wouldn't eat emu meat again, too tough and doesn't take the flavours well. Useless meat. Do you think I will change my opinion on Emu meat?

I still have a lot of favourites at Al Karam. Will keep getting take-aways from there. Honestly good food at affordable prices I must add.

everyday subzi: mungodi wali lauki or bottle gourd curry with mung fritters

$
0
0


Mungodi wali lauki is another simple curry that can be cooked for everyday meals. I have been posting a lot of everyday curry recipes lately, and that is because I have been getting loads of requests for simple home style curries that one eats everyday. And to tell you the truth, I have been getting reminded of so many favourites I have tasted in my life so far. Some of them I learnt from my mother, some from my grandmother, some from friends but this one I learnt from my MIL. She used to cook mungodi wali lauki quite often but she would always use dry store bought mungodis for convenience. 

Later I tasted a mungodi subzi (without lauki) cooked by a friend and tried adding those freshly made mungodis to the plain lauki subzi and the result made me so happy. I keep going back to this subzi because I eat lauki a lot and I need variation every day. There will be more and more lauki recipes on this blog very soon, now that I have been posting every day curries with a new zest.This mungodi wali lauki is a jain recipe because no onion or garlic is used. You can fry the mung daal fritters in a large batch and keep them frozen to be used again to make a quick mungodi wali lauki or a mungodi wal kadhi too.    

Recipe of mungodi...

Soak a cup of mung daal in enough water for 4 hours. Drain and make a paste along with 1 tsp cumin seeds. Do not add water while making a paste. 

Heat oil for deep frying. Drop small spoonfuls of mung paste into hot oil and fry on medium heat so the mungodis cook thoroughly. Drain on kitchen tissue and keep aside.

Recipe of mungodi wali lauki..

ingredients

lauki peeled and cut into large cubes 300-400 gm
about 2 dozen small mungodis or as many you want
cumin seeds 1 tsp
chopped green chillies 1 tsp
minced ginger 1 tsp
turmeric powder 1 tsp
ghee or mustard oil 1 tsp
salt to taste

procedure

Heat oil or ghee in a pan or pressure cooker. Note that the freshly fired mungodis behave well in an open pan but the frozen ones would need to be pressure cooked or cooked for a bit longer if cooking in a pan.

Tip in cumin seeds and ginger and green chillies and quickly add the turmeric powder and cubed lauki. Toss and mix well. Cook for a couple of minutes tossing all the while.

Now add the salt, the mungodis and a cup of water for each dozen of mungodis. They soak up a lot of water and get doubled in size. Cover and pressure cook till the first whistle blows. Let the cooker cool down on it's own and serve hot with or without a garnish of green coriander leaves.


I can polish off this curry as it is. The mungodis make this subzi a filling meal.

Note : These mungodis do not soak up oil while frying but you need to be careful to keep the mung paste thick and make the fritters uniformly smooth all over. Loose paste (batter) or uneven surface of the fritters allow them to soak up oil and make them heavy.

everyday subzi: making lauki ki muthia and using it in many ways

$
0
0


Muthia is a steamed dumpling made with grated vegetables and chickpea flour which is made into a dough and then rolled into sausage shaped 'muthia' before placing them on the steamer. The traditional muthia is made by pressing a portion of dough inside the fist (muthhi) hence the name muthia. It is a Gujrati tradition but popular all over India in some or the other form. Muthias get steamed quickly and can be cut into small pieces and served along with some green chutney.

Or the cut pieces of muthia can be shallow fried along with some tempering to be served as a tea time snack.

Lauki ki muthia is an easy way to make the meals filling and nourishing. Since we use besan (chickpea flour) to bind the muthias it makes a gluten free meal too. Please note that the recipe is easy and takes just about 20 minutes if you are making muthias for 3-4 people. And these steamed muthias can be refrigerated and used later to make tea time snacks or even kofta curries.

If you get the lauki (bottle gourd) grated in a food processor or get it done by the maid (we are spoiled in India :-)), the procedure will be even more quick.

ingredients

grated lauki 2 cups (about 400 gm)
besan or chickpea flour 3/4-1 cup or a bit more
ginger paste 1 tsp
garlic paste 1/2 tsp
cumin powder 1 tsp
ajwain seeds 1 tsp
turmeric powder 1 tsp
green chillies minced 1 tsp or more
salt and pepper to taste
oil or ghee to smear the plate and hands while working with the dough

procedure

Mix all the dry ingredients with the grated lauki and massage them together so the water from lauki helps make it a dough. You might need to add a little more besan or little more lauki depending on how fresh and tender the lauki is. I recommend the freshest lauki you can find. See how to choose the right tender bottle gourd.

Now grease a ceramic or pyrex dish and your hands too. Pinch portions of the dough and shape them like 2 cm thick sausages or press portion in your fist to shape them like traditional muthias. Arrange all such sausages (or muthias) on the greased dish.


 Now cover the dish with cling wrap loosely. Leaving some space for the steam to escape. Make cuts in the cling wrap otherwise.

You can cover the plate with a dome shaped plastic lid meant for microwave and steam it for 5 minutes too. With the cling wrap too it takes the same time.


The muthias get cooked as steam condenses on the cling wrap. Peel off the cling wrap and use the muthias as required. These can be enjoyed right away with green chutney or with any sauce or salsa you like.


These can be steamed over the gas stove too. See this post about another steamed dumplings to get an idea how a simple contraption can be used to steam these.

Once cooled, the muthias get firm and can be shallow fried along with mustard seeds, hing and some sesame seeds for crunch. Sprinkle some amchoor powder or lime juice and have these with some warm salad for a meal. Here I served it with a beans and carrot poriyal and pickled cucumbers.


We sometimes use these muthias to make kofta style curries too. Just deep fry or shallow fry these muthias and curry them with a north Indian style bhuna masala.

I normally shallow fry these muthias cut into one inch long pieces, and pressure cook them along with some bhuna masala and water. Add enough water to the muthia as they soak up a lot of water and double in size when cooked into a curry.

Refrigerated (2-3 day old) muthias behave well in pressure cooker as they get firm and do not break. You can cook this curry in an open pan if using freshly made muthias.


This lauki muthia kofta curry tastes great with roti, paratha or plain boiled rice but you can always make the curry light and thin and have it as a one pot meal as I do sometimes.

We love this kind of kofta curries better than the fried round koftas (like this kele ka kofta). This muthia kind of kofta works better for lauki and is healthier as well. I don't remember if I have cooked a traditional lauki ka kofta ever in my life. But I love besan dumpling curries so this lauki muthia kofta style curry is one of the favourites. The taste and texture is quite different and so is the health quotient of this curry.

Let me know whenever you try making muthias this way in the microwave. It will be the easiest healthy snack to munch on and some spicy curry can be whipped up in a jiffy.


tasting temple cuisine at Masala Art, Taj Palace and a recipe of jaggery-ginger-tulsi lemonade, the gur ki shikanji

$
0
0


I had the best ganne ka ras recently and it was redolent with flavours of tulsi (holy Basil) and a bit of ginger. Thick pure sugarcane juice is a rare thing to come by and I took another helping at Masala Art, Taj Palace Hotel when I was there to taste their menu around Temple cuisines of India. Nothing can be better than ganne ka ras I though, I could skip having any temple food for this.

But then this tulsi infused water was more fun and I needed it. I had a throat infection and was anyway having a lot of ginger and tulsi infusion at home. Cold water with tulsi felt nice and comforting.


I loved the way they made us wash our hands in a brass urli. Purity while eating is after all a temple ritual.


And then my thali arrived that was a Bengali pujo thali, having all items of bhog in it. I dogged into the khichdi first, just couldn't resist as I have been missing the puja khichdi since my days in Dhanbad. And the khichdi took me back to the pujo days. Exactly the same taste with lightly fired cauliflower florets added in the cooked khichdi.


I liked everything else in this Bengali thali, the shukto, the chorchori, the potoler dalna and chholar daal. The slice of gondhoraj lebu not to be missed. Kheer was good if not excellent. I have had better bong kheer.

They have introduced Temple bhog thalis from all 4 corners of India and I tasted bits form the south Indian thali, the Western thali (Gujrati) and the Punjabi thali. I loved the Gujrati khichdi too and not just for my love of all things khichdi but it was really well done. I wouldn't care for the meethi kadhi or khatte mithe alu but the sukhdi in Guju thali was superb.

I tasted a few things from the south Indian thali too. Loved the rasam but sundal and pulihora was dull, a bit too dry for my taste.

Here is the Punjabi thali which had the chhole, daal makhni, tari wale alu etc and everything was done right. Chhole a bit too tart but it is a personal choice. What I loved the most was atte ka halwa that was made just like home.


 I have never tasted such good atte ka halwa apart from my own home. Kudos to the team to attempt this atte ka halwa for a menu, it is not easy to pull off.

Masala art will be doing this Temple cuisine thali every Navratra and one can enjoy these traditional meals without onion and garlic twice a year. They serve bengali kosha mangsho, bhetki paturi, chingri malai curry etc as well in their seafod thali and nonveg thali during Navratras. Bengalis eat all kinds of foods outside the puja pandal so it makes sense.

And then I was back home after a generous dose of temple cuisine into my system. I had eaten so much I skipped the dinner that day and breakfast the next day. But when I got hungry, I wanted ganne ka ras.

The closest I could do is gur ki shikanji and that is what I did.


Here is how to do it.

Boil 1 tbsp of grated fresh ginger root and a handful of tulsi leaves in a liter of water. Turn off the gas as soon as the water boils. Cover and let it cool. Strain the infusion when cold.

Add 3 tbsp of fresh lime juice and 2 tbsp of natural unbleached sugar or grated jaggery to the infusion and dissolve well.


Serve with or without ice cubes. I still had a mild throat infection so enjoyed the gur ki shikanji at room temperature.

You can even have this infusion warm if you want to have it in winters. Gur ki shikanji would be a nice adrak tulsi ki chai in that case.


everyday subzi : lobiya wala keema with shrimp paste

$
0
0


Some curries are experimental but become a favourite from the first time they are cooked. This lobiya wala keema is one of those recipes that I cooked on a whim one day and have repeated a few times already. I do cook keema curry with added vegetables quite a lot and many keema recipes on this blog would not disappoint you in this regard but this time I wanted to get some extra flavours and I did a trick.

I added some shrimp paste (home made) to this curry and it took this keema and lobiya curry to another level altogether. I am waiting when to repeat more curries with keema and some or the other vegetables. Of course with added shrimp paste :-)

I make my own shrimp paste and have cooked it earlier with long beans. A freshly made shrimp paste recipe (sambal belacan) is there on the healthfood blog. This time I just made a paste with ginger and garlic and used the whole paste in this curry. I know I will be repeating this way of using dry shrimps for sure.

ingredients
(4 servings with rotis and raita)

chopped lobiya (in 1 cm bits) 250 gm
finely chopped onions 100 gm
mutton keema (mince) 200 gm
fresh tomato paste 100 gm (3/4 cup)
chopped ginger 2 tsp
chopped garlic 2 tsp
turmeric powder 1 tsp
red chilly powder 1 tsp or to taste
everyday curry powder 1 tbsp
special garam masala powder 1/2 tsp
(or a powder of cinnamon, green and black cardamoms and cloves)
dry shrimps 1 tbsp
salt to taste
mustard oil 1-2 tbsp
cumin seeds 1 tsp
tejpatta 2

procedure (takes about 40 minutes total)

Make a paste of garlic, ginger and shrimp and keep aside.

Heat oil in a deep thick base kadhai and tip in the cumin seeds and tejpatta. Add the chopped onions and fry till pinkish brown.

Now add the shrimp paste and the chopped lobiya both. Add salt and powdered spices as well and keep stirring to mix well as the mixture cooks and gets aromatic. It takes about 5-7 minutes.

Now add the keema and keep stirring to break the keema and cook till it starts releasing fat.

Add the fresh tomato paste and cook for about 5 minutes more, stirring all the while.

Now add a cup of water and cover the kadhai. Let the curry simmer on low flame for about 25 minutes. Serve hot.


There is no need to garnish this curry with any herbs as the aroma of shrimp paste cooked with the spicy gravy id really something you wouldn't want to mask. But add a few springs of coriander greens if you like. Some chopped green chillies and minced or julienne ginger will be good if you want the curry to be hot, especially if you are having it with khameeri roti.

The flavours are very meaty, very rich umami hints and the lobiya somehow seems to add to the flavours too. I think I would like this keema curry with cauliflower and may be with cabbage as well. I have more dry shrimps as I had ordered loads of ti from Anjali Koli of Annaparabramha. And I intend to use it well.

Let me try and let you know. Or you try and tell me what way you liked it.


easy diwali mithai : kaddu ka kalakand or pumpkin kalakand recipe

$
0
0


My Diwali greetings to you all with this easy recipe of pumpkin kalakand. May you find more light, fight darkness successfully and lead others towards light too. Diwali brings that kind of vibes if we are open to it. And there is some mithai, some diyas and candles after a mandatory spring cleaning exercise. The woollies will be out soon and we will soon eat some chooda matar with the fresh tender green peas. Every banarasi starts dreaming of chooda matar breakfasts as soon as there is the first sign of winter.

I have been away for quite a long time, was traveling for the good part of it and then got caught up with pending work that had to be finished on priority. Thank you for writing back to me and let me know you all were missing my posts here. I shall try and write more regularly and bring the food we love. Will come back with storied from Mysore too.


I hope you would like this pumpkin kalakand. Kalakand is a soft cheesecake like dessert with granular solids of lightly curdled milk if I have to describe it, but the good thing is that kalakand can be made with many shortcut methods with very minute difference in the resulting taste and texture. Since the milk is reduced first and curdled lightly in the traditional method of making kalakand the texture is richer with the traditional method. But then we make the recipes suitable for a modern lifestyle, to be able to cook them in lesser time, make them healthier etc etc. and try and replicate the original.

This short cut kalakand recipe that also includes some good fiber and carotenes is very close to the texture of original kalakand with added taste of ripe pumpkin and a hint of nutmeg. I had made an apple kalakand (in microwave) last year and many of my friends and readers had made that at home within a couple of days. And I remember how I kept getting requests regarding how the recipe can be adjusted to stove top method and if one could replace the milk powder with something else.

In the last year I have made that apple kalakand several times both in microwave and a heavy bottomed pan and recently I taught that recipe to the volunteer Chefs at ISKON Mysore as well. Even they wanted an alternate recipe of such an easy and tasty mithai so I decided to work on another kalakand recipe that is fairly easy and takes a little more time than the apple kalakand.


Using grated pumpkin was on my mind for some time and I had to do it. I did two trials and found that precooking the grated pumpkin works better. I microwaved a cup of grated pumpkin for 2 minutes before using it for kalakand and used freshly made paneer for it. Minimal sugar to sweeten it as always.

Total time that this recipe takes would be around 30 minutes of grating pumpkin, making paneer (chhena) and cooking again and about an hour of refrigeration to set the kalakand properly.

ingredients
(for 16 regular sized kalakand)

grated pumpkin (use the orange fleshed ripe pumpkin) 1 cup packed
whole milk (6%) 1 kilo
fresh cream 3 tbsp
lime juice 2 tbsp diluted with 2 tbsp water
nutmeg powder 1 pinch
sugar to taste. I used 4 tbsp
chopped pistachios to garnish (or any other nuts)

procedure

Microwave the grated pumpkin for 2 minutes or cook them till they get limp and soft but not mushy. Keep side.

Heat the milk in a large pot till a thin film of fat starts forming on top. Wait till the point where the milk is just about to boil. Add the lime juice 1 tsp at a time at this point and keep stirring the milk. Stop adding the lime juice as soon as you see curdled milk and clear whey.

Line a strainer with muslin and keep it over another pot to collect whey. Pour the milk into the strainer and let the whey separate (the whey can be used to knead bread dough). Collect the milk solids and crumble it using a potato masher nicely.

Now place this crumbled paneer (or chhena) into a pan along with the half cooked grated pumpkin and sugar and cook for about 5 minutes on medium flame. It would release some water and start drying up. Add the fresh cream and nutmeg powder together and cook till it is all dry but moist.

Empty the contents on a greased tray or plate and flatten the mixture using a flat knife. Make the edges smooth and shape it so you can cut uniform pieces. Or just use a suitable square dish to spread the mix. Sprinkle chopped nuts and press them so they stick well.


Refrigerate this plate for an hour or so. Cut pieces and serve as required. This kalakand stays well in the fridge for 4 days easily. Keep it in an airtight container lined with butter paper.

The texture of this kalakand is crumbly as it should be but it binds well and doesn't break into your hands. If it breaks while lifting it means it needs some more cooking so cook it again and let it dry a bit more and let it set again.


You can add any spices of your choice to this kalakand as pumpkin takes spices really well in desserts. You would be surprised at how well it works with this kalakand. A mild hint of nutmeg and a deep rich taste of pumpkin with taste and texture of a regular kalakand. That's how this pumpkin kalakand tastes.

Make this diwali healthier with home made mithai I must add. We never buy any mithai during festivals as there is a lot of spurious stuff added to them during season of high demand.

Ever wonder how much milk production do we do in the country not to disrupt regular milk supply and still convert the world into a big mithai shop during festivals?


everyday subzi : achari mushroom alu | mushrooms, baby potatoes and baby onions stir fry in pickling spices

$
0
0


Mushrooms make quick and tasty curries and stir fries, they are easy to clean and chop without any special skills and are available almost throughout the year. These qualities make them a frequent appearance in my kitchen and I feel adding some chopped mushrooms to my omelets, egg scrambles, soupsstir fries and even mushroom sauce to coat a meat dish. The most common use of mushrooms is done in the morning rush hours naturally. Mushrooms with spring onions is another favourite in winter season.

Since I cook a lunch box for Arvind in the morning I often end up cooking a variant of pickled mushroom stir fry that he likes well with his roti or paratha. This achari mushroom with paneer I cook when there is no other protein for the lunch box and the one I am sharing now is cooked when there is some rajma or chhole or chicken mince to go inside the lunch box. He avoids non veg with bones for lunch box for obvious reasons.

This achari mushroom uses slightly different spices and the end result is quite different too. There are actually many versions of achari mushrooms and a few of them use tomatoes and tomato puree in it but I like achari mushrooms a bit dry.

ingredients
(2-3 servings)
boiled and peeled baby potatoes, halved  6-8
button mushrooms halved or quartered depending on size 200 gm
baby onions peeled, halved or quartered about 12-14

spice powders 
turmeric powder 1 tsp
red chilly powder 1/4 tsp
Kashmiri chilly powder 1 tsp
ginger powder 1/2 tsp
fennel powder 1/2 tsp
asafotida (hing) powder 1 pinch

lime juice 1 tsp mixed with 4 tbsp water
nigella (kalonji) seeds 1/2 tsp
fenugreek (methi) seeds 1/4 tsp
mustard oil 1.5 tbsp
salt to taste

procedure

Mix the spice powders in lime juice solution along with salt and keep aside.

Heat the oil in a pan and tip in the fenugreek and nigella seeds and let them get aromatic. Take care not to bur them. Now pour the spice mix into it and stir well. Cook till the oil floats on top, it takes about a minute or so.

Now add the quartered mushrooms and stir fry till they start wilting. Add the halved potatoes and keep tossing till they get coated for 2 minutes. Add the baby onion quarters in the last and cook for 2 minutes more.

Take off heat and garnish with fresh chopped green chillies. This achari mushroom alu tastes good either hot or at room temperature. A good test of any achari dish. It keeps well in the fridge for 2 days if it lasts that long.


I make the use of the 2 most ubiquitous ingredients potatoes and onions in this recipe but mushrooms are also almost always there in my fridge. I have to buy mushrooms whenever I see them fresh and I wait for the season when they will be cheap.

Oh and if you have bought too many packs of mushrooms they don't spoil in the fridge. Mushrooms keep well for a week normally but if I buy them in bulk I simply keep a few packs of them cleaned and spread over a bamboo plate inside the fridge. The mushrooms dehydrate this way and last for about a month or more, these fridge dehydrated mushrooms can be re-hydrated quickly and used for any recipe easily.

I am sure you also love mushrooms and if you are looking for recipes other than matar mushroom or kadhai mushroom, I gave you many options in this post. Do try them and let me know if you like. Mushrooms are good for health.


And if you want to be indulgent with mushrooms you can make mushroom manchurian, the indo-chinese fusion we make with button mushrooms occasionally.


sooran ki subzi for diwali : the tradition of eating sooran on diwali

$
0
0


Sooran is also called Zamikand or Zimikand in Hindi, Oal or Ol in Bengal or Elephant foot yam in English. There are many names in other Indian languages you can check here as I don't have a picture of the whole raw yam. This is an ugly looking tuber (actually corm) that doesn't look very appealing on supermarket shelves or even at the neighborhood subziwala, but if you have had a good curry cooked with it, you would hunt this vegetable like crazy. I have seen many people including my dad hunting for sooran whenever they don't get it. We had once grown a lot of sooran in our backyard long back but that variety was the one that causes itch. Although it was edible and super tasty when cooked rightly.

Yes, sooran or suran as we call it, itches a lot if it is the desi variety. Desi sooran has many small bulbous outgrowths from the surface while the other variety is called 'bambaiyya' (meaning Bombay sooran) which has minor itchiness, bambaiyya sooran has a smooth outer skin. The itchiness in this tuber is due to a high concentration of oxalic acid that can be neutralized by washing it well, boiling it and marinating it with lime juice or tamarind juice. One needs to wear gloves or apply mustard oil while cutting sooran as it itches really bad when it does. If the itchiness is not treated well even the cooked curry causes a bad itch in the throat but I am not telling you to scare you, this information is just to let you know that this vegetable needs to be treated well before cooking. Especially if you are using the desi sooran.

There is a tradition involved with sooran and it is considered auspicious on the day of Diwali. Sooran ki subzi was a must on Diwali at my parents place and I saw the same with Arvind's family as well. They probably had adopted the tradition of Banaras to eat sooran on the day of Diwali. Sooran is considered auspicious because it is a vegetable that grows by corms and some small corms remain in the Earth even after harvest and it grows in the next season by itself and spreads really fast. Diwali is a festival to grow and preserve wealth and this quality of sooran is considered auspicious, hence the tradition of eating sooran on Diwali.

This sooran ki subzi is exactly like the one that was made at my parents' home. I sometimes cook the sooran ke shami kabab or sooran ka chokha when I am not in a mood for a spicy curry but this curry is one of the best recipes that has not changed a bit even in my hyper experimental kitchen. This sooran ki subzi has survived the test of time and enthusiasm of a mad experimenting cook. Some tastes are so comforting you want to bring back from past repeatedly. This is one of those.

My mom and dadi (grandmother) used to treat sooran differently depending on what variety of sooran was brought from the local market. The desi one needed a longer marination in lime juice and sometimes they used a paste of Harad (a dry herb, a seed) or even a mix of amchoor, lime juice and tamarind sometimes. Some varieties of sooran are that dangerously itchy. But those who love this vegetable do anything to get the taste.

Luckily now we get the bambaiyya variety of sooran more, but the bad thing is that the desi variety might get lost. Anyway, sooran would survive as the Diwali tradition ensures. Eating a particular green or vegetable on a certain festival has ensured many native varieties to survive and be available at least in the designated time.

Coming to the recipe, this recipe is for the bambaiyya sooran that is not itchy at all. You would get the idea while chopping the corm if it is itchy so add lime juice, tamarind juice or a little vinegar after chopping the sooran and let it sit for a day before cooking if it is too itchy. Or an hour's marination is good. Harad is used in the form of spice paste and is ground along with the spices (1 harad for about 250 gm sooran), and gives the curry a darker hue. But the taste is great in any case.

This recipe is a Jain recipe (without onion garlic), was made after the Diwali puja and we have always liked it this way. But I cooked this curry with some onion and garlic paste added and it tasted great that way too. Feel free to adapt the recipe if you are not looking for the real eastern UP version.

ingredients
(5-6 servings along with other side dishes)

sooran cleaned and cubed 250 gm

for masala paste

chopped ginger 2 inch piece
whole coriander seeds 2 tbsp
whole cumin seeds 1 tbsp
whole black peppercorns 2 tsp or a bit more
tejpatta scissor cut 3-4
whole dry red chillies 3-5 as per taste
black cardamom 2
green cardamoms 5
cloves 6
cinnamon sticks 2 inch piece broken in small bits

large ripe tomatoes 3 (or tamarind pulp 2 tbsp)
salt to taste
home made amchoor powder 1 tsp (use 2 tsp if store bought)
mustard oil 3-4 tbsp

procedure

My mom used to deep fry the sooran cubes and I tried it that way a few times, it takes longer to get softened in the curry I noticed. Later I saw sooran being cooked straight away in watery medium (gravy) in some Kerala style curries and adapted my recipe to be cooked directly and not deep frying and it worked well. Though you can deep fry and proceed as per this recipe.


I used the soorna cubes raw, added them after bhunoing the masala paste nicely before adding water and simmering it for a long time. Slow cooking is the best for such curries so don't be in a hurry for this please. Although pressure cooker gives close results but you never know how long the avaialble variety of sooran would take to cook.

Make a wet paste of all the spices listed for paste, adding about 1/4 cup of water. Make a paste of tomatoes too in the same blender. Keep aside.

Heat the oil in a deep and thick bottom pan and tip in the 1 tsp cumin seeds. Pour the masala paste as soon as the cumin splutters and stir to let it cook. Keep stirring and bhunoing on medium flame till the oil separates. Now add the salt and tomato paste and bhuno again till oil separates.

Now add the cubed sooran, mix well, add about 2.5 cups of water and let the curry simmer for about 35-40 minutes on very low flame. The gravy would become thick and will be of coating consistency. Add amchoor powder and mix well. Garnish with dhaniya patta if you wish but I like this curry in it's own flavours and aromas.

Serve hot but this curry tastes great even on room temperature. This sooran ki subzi keeps well in the fridge for a week, make it a large batch if you like it. It can also be frozen successfully without changing the texture or taste. Note that if you find this sooran ki subzi itchy in the throat after cooking it, you just let the subzi rest for a couple of days in the fridge. It will get better as the souring agents used in the recipe will get time to work on sooran..


We enjoyed this subzi for 3 meals along with other green vegetables and salads but this subzi is not heavy on the tummy at all, it was not itchy sooran luckily. Sooran is considered very good for GI tract and for many other health conditions. Will write about that aspect some other time as this sooran ki subzi significance on Diwali write up has already become quite long.

Don't wait till the next Diwali to make this sooran ki subzi, get some sooran and cook it this weekend and enjoy the  subzi whole week if you like this. I am going to get more sooran for sure. I have already made a chutney this season and have to experiment with a sooran ki subzi I tasted in Mysore. Will definitely share those too. Enjoy this recipe and others form this blog till then.


travel and food : the best places to eat in Mysore, the way we like it

$
0
0

I discovered Mysore masala dosa all over again. Yes I mean it when I say this. All of us siblings use to love the dosas my mom made at home with a creamy potato curry to fill the delicate dosas. And a plain coconut chutney and sambar that only she could make, other aunts we knew would make it differently. We were kids and never realised that dosas, sambars and chutneys can be of different types belonging to different states of the south India. We loved all the other dosa variants but the one mom made was always the best. We grew up on that dosa loving it absolutely.

And then somehow I spoiled it when I started cooking it myself. In my zeal of experimentation I added what I liked and although the resulting dosa was always good, it was not the same. We siblings would often talk about the subtly flavoured dosa mom used to make long long ago. By the way my mom was never fond of cooking and she wriggled out of making dosas or anything for that matter, as soon as we grew up and carried on with our own lives, all of us siblings I mean. We would never find any home made dosa when we went back and that 'mummy ke haath ka dosa' memory became dormant.

We always knew that mom had learned her dosa from some neighbor in Nainital when papa was posted there, which is my birth place too by the way. But there was never a question of where this neighbor belonged to. I discovered rather awkwardly in Mysore. The first dosa at the CFTRI students mess we had reminded me of 'mummy ke haath ka dosa'. The identity of the Mysore masala dosa downed upon me in a moment of epiphany, dormant memories awakened. I grew up eating this sort of masala dosa and never knew this was the one. The one called Mysore masala dosa. To us it was just masala dosa, sans an identity attributed to a place.

Later we discovered a few more stalwarts in the world of Mysore masala dosas. In Mysore of course. This used to a frequent breakfast masala dosa at the CFTRI students mess where we chose to have our daily breakfast.


For other meals we used to explore the city. Well mostly it was just myself as Arvind used to be busy in his official work he was there for. I saw all the museums, lakes, markets and a few temples in the 2 weeks we were there.

The best way to explore food in a city is to go around on foot or on public transport and see the street food if you can afford to. And I don't see any reason that can stop you from doing that, apart from a stomach infection if your immune system gets it as a shock. But I have never ever had a stomach problem with street food rather some five start food sometimes has caused a problem. Street vendors buy ingredients, cook and sell every single day and there is no recycling of ingredients, the food is served piping hot and things move quite fast. There is very little chance of contamination after the food being cooked as it is served immediately in most cases. And you should look for all such places where more people are eating to ensure good taste and the food is moving fast to ensure hygiene. You just have to take care of the water you drink and avoid all raw salads that's all.


The first great dosa I had in Mysore was at a roadside eat street that my friend Shubha Shashikant had told me about. This street is behind the Marimallapa college and the autowalas (the tuktuk drivers) know it as 'chaat street behind Marimallapa college'. These street food vendors come by the road only by evening and you would see many bikes and scooters of students parked there and some portly middle aged men probably on the return from offices lined up up to have a bite and loads of gossip. We also spotted a few families too who used the seat of their motorbikes as a table and were having a good time. There were few cars that stopped by and people had food inside the car but this eat street looks like more popular with students and office goers as we found herds of them enjoying plates after plates of good food.


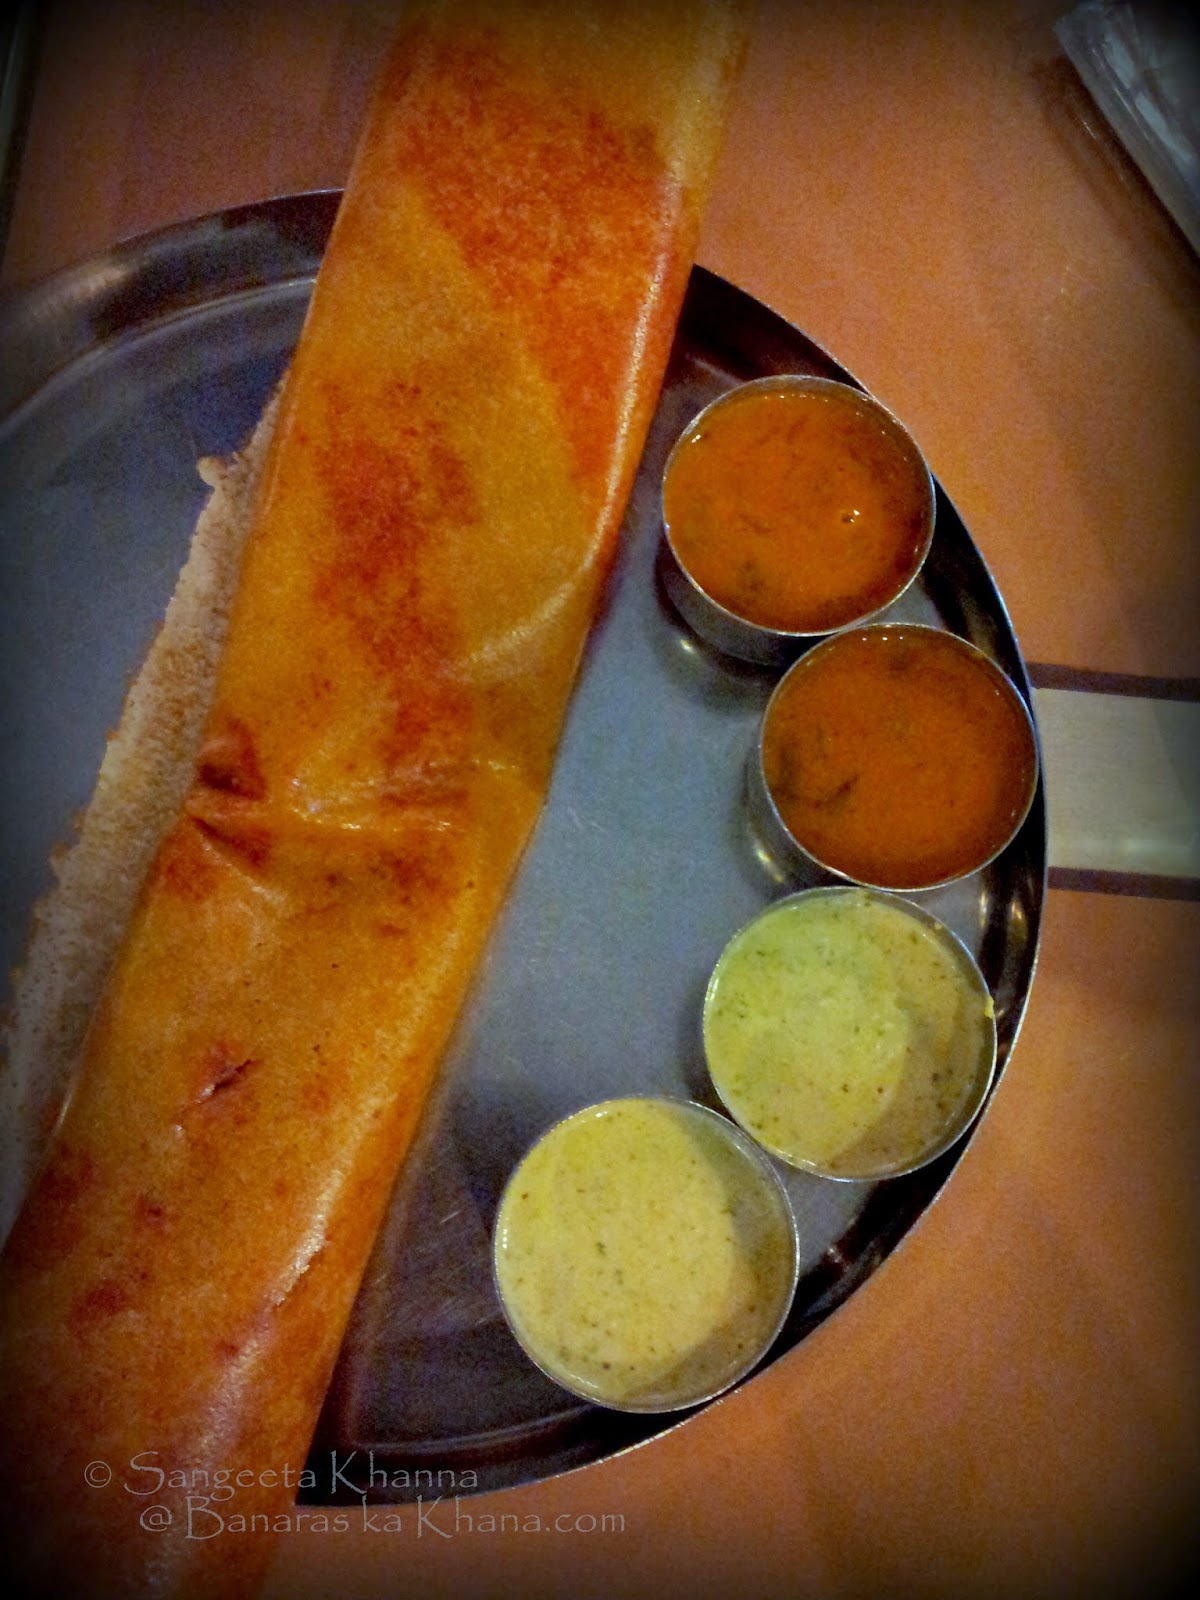
 Our find of the day here was a Mysore masala dosa, very predictably you would say. I like the crisp but yet spongy dosa and the creamy mushy potatoes that they fill the dosa with. Simple clean honest flavours served in a humble way, each dosa costs 40 Rs. I remember everything on this street was either 40 or 30 Rs and the vendors had their own stalls of bottled water too. This dosa is smeared with a red chutney and then a dollop of creamy potato filling is slathered over it and the dosa is folded neatly. Served over a paper plate placed over a quarter piece of a newspaper.


And then we tasted and liked the idli and sambar vada as well, the benefits of 2 people sharing plates of food, we could taste more but not all. We tasted puliogare too but did not like it much. But many people were lining up for puliogare and gobi manchurian. Now gobi manchurian was one thing I could not muster the courage to try. There are stalls of golgappa too but not worth, we ordered one plate and tasted one golgappa each, couldn't eat the next.

Our driver had recommended another place called Guru Residency for a meal and we marched towards the place from CFTRI campus one day. This is a tall building of a hotel with the restaurant on the first floor. Quite crowded during Dassehra but this place is popular among the locals it seems. We ordered a masala dosa and an onion uttapam as these were the things we would like in a vegetarian restaurant in Mysore. While the dosa looked impressive with it's size, accompanied with 2 bowls of sambar and 2 bowls of coconut chutney, it was a good dosa but nothing great to write home about. We clciked only cell phone pictures as a big camera makes people really conscious and extremely curious at times in such places.


But we loved the Onion uttapam we ordered. I wish we had more appetite and try a few more things on the menu. In fact we could not finish the huge dosa between the 2 of us. Onion uttapam we finished, it was well made and really tasty with finelu chopped onions spread as a uniform layer on the uttapam. But the lentil curry that came with the uttapam was not our taste. Coconut chutney was average. We had coffee that was good if not the best.


The good thing is, that we tasted another great dosa at 
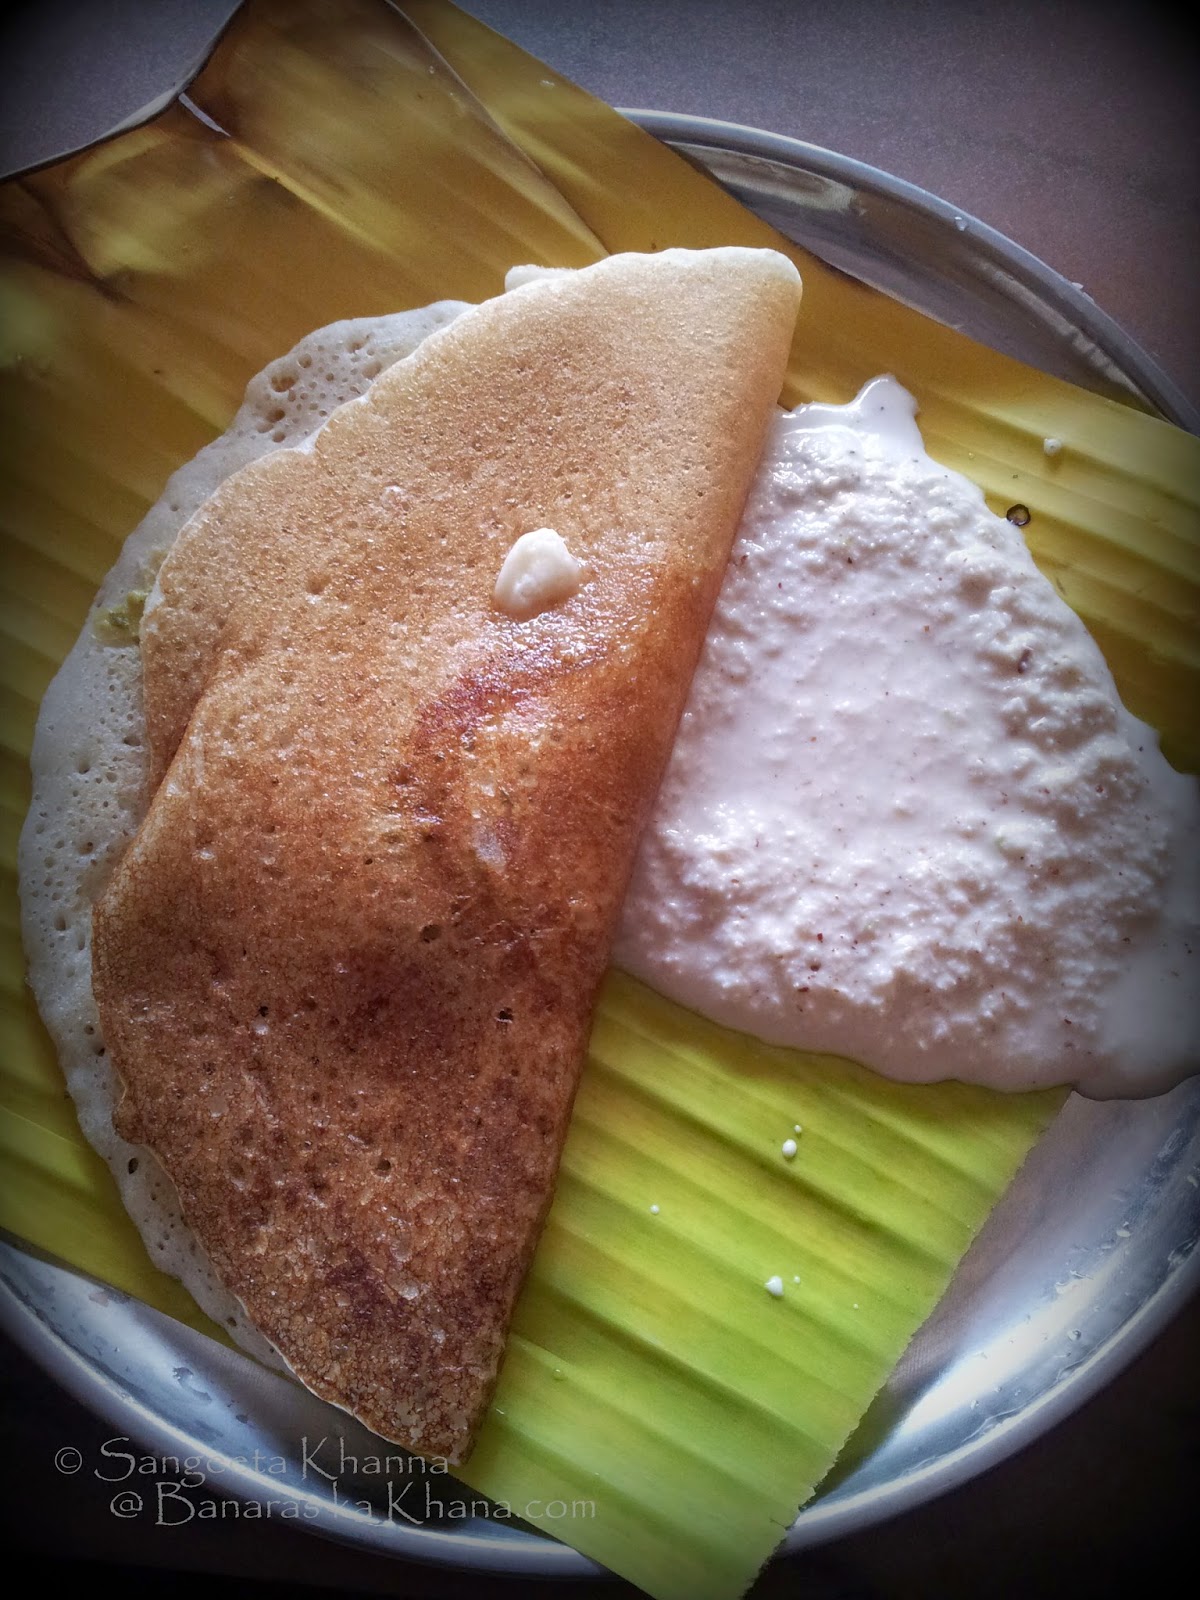
Hotel Vinayaka Mylari at Nazarbad. I hear this small restaurant is 70 year old and has been serving just dosa and idli since then. Dosa has a nice filling of masala and coconut coated beans (or other vegetables) and a blob of white butter is served over it. A plain white coconut chutney is served on the other side of the plate lined with banana leaf. We waited for our table for 30 minutes it was so crowded.

The most soft and spongy dosa I have ever had and the best flavour of fermentation that one can get in a dosa. The idli was very soft, I had idli with butter for the first time. This is a must visit place in Mysore. They serve coffee too and the wait staff is both men and women, they keep bringing more food to your table just like old fashioned wedding feasts and a small slip is produced as you finish. For 4 dosas, 2 plates of idli and 2 coffees our total bill was 90 Rs.


Only one picture was clicked before we dug into the dosa and then there was no looking back. We ate with our soul spread over the banana leaf and fingers smeared into a rustic pleasure. No time to think of clicking a picture.

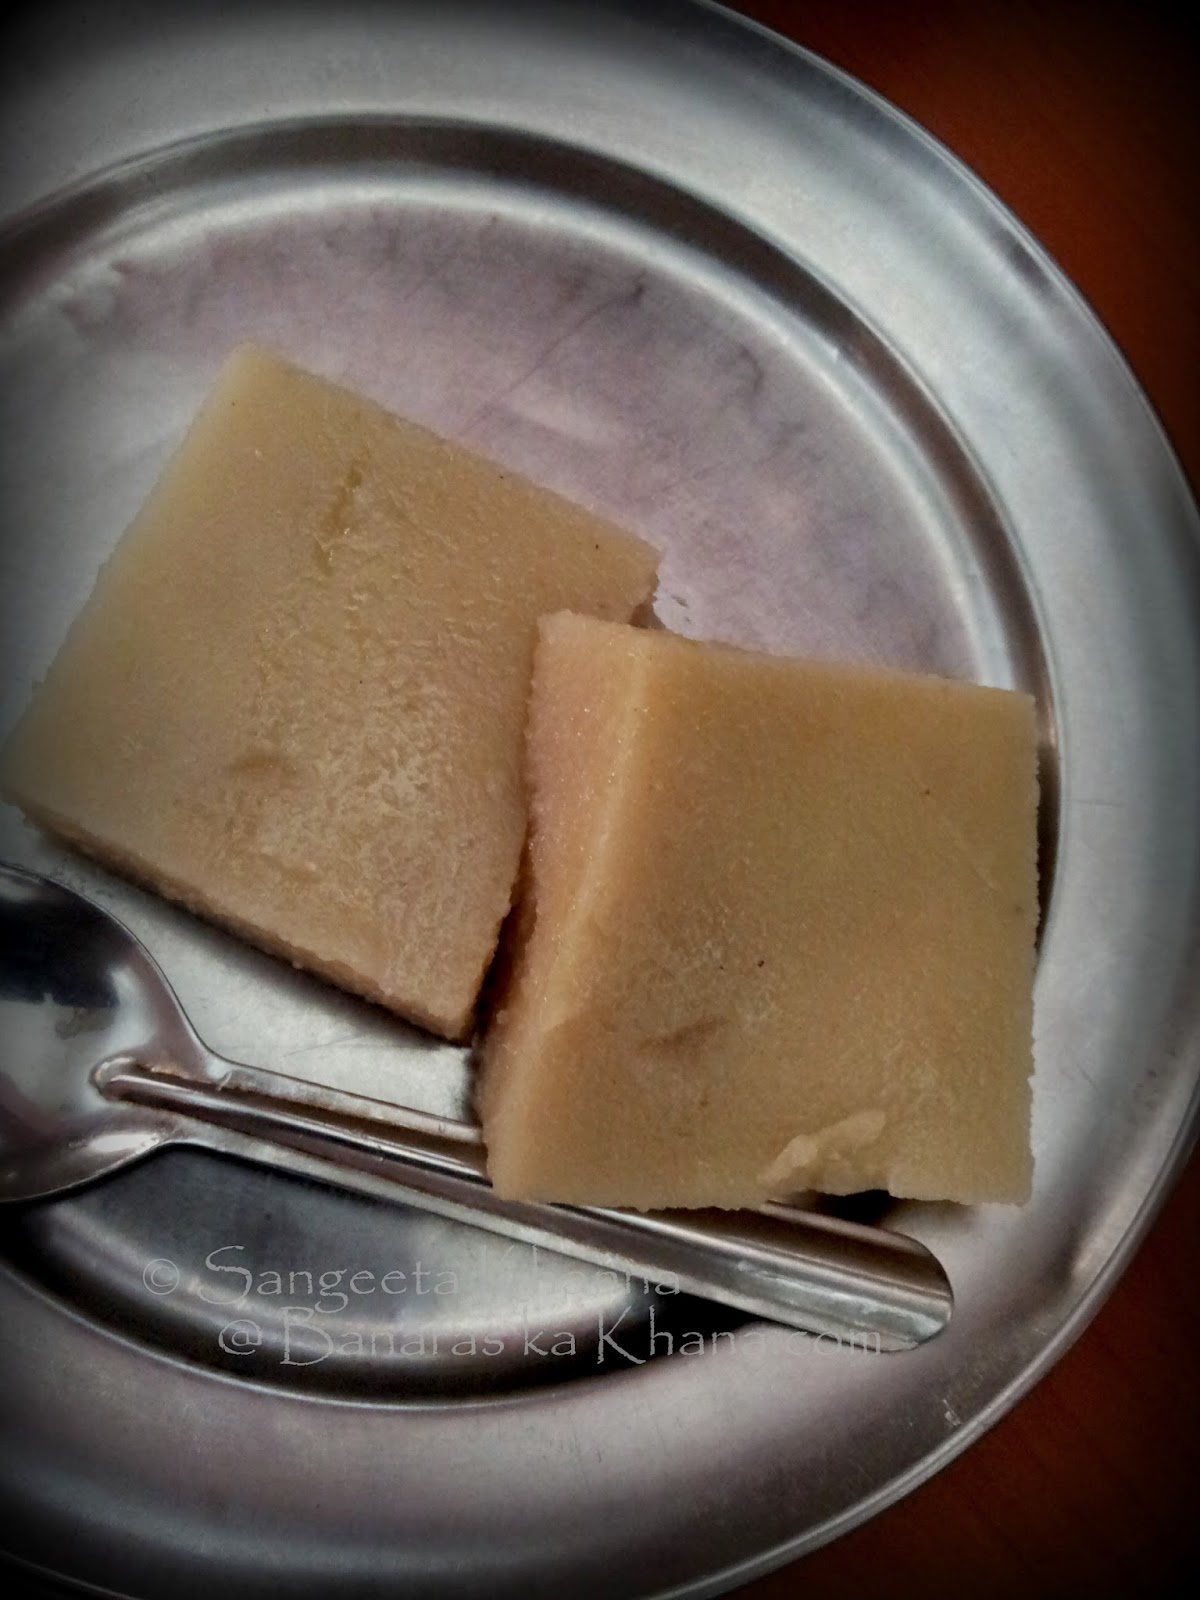
Another day we met Shubha and her family in market and she suggested we taste this authentic Mysorean mithai called Halbai. Halbai is apparently available only at Hotel Dasaprakash so we walked to the Hotel to taste this. This mithai called Halbai is actually a pudding that is cut into squares. The taste is mild sweet with hints of coconut. Soaked rice and coconut is ground and strained and then cooked till thick along with ghee and sugar. The cooked mixture sets into a jelly like layer which is cut into squared and served per piece as most Indian mithais. We liked the subtle taste in this lesser known mithai from Mysore.


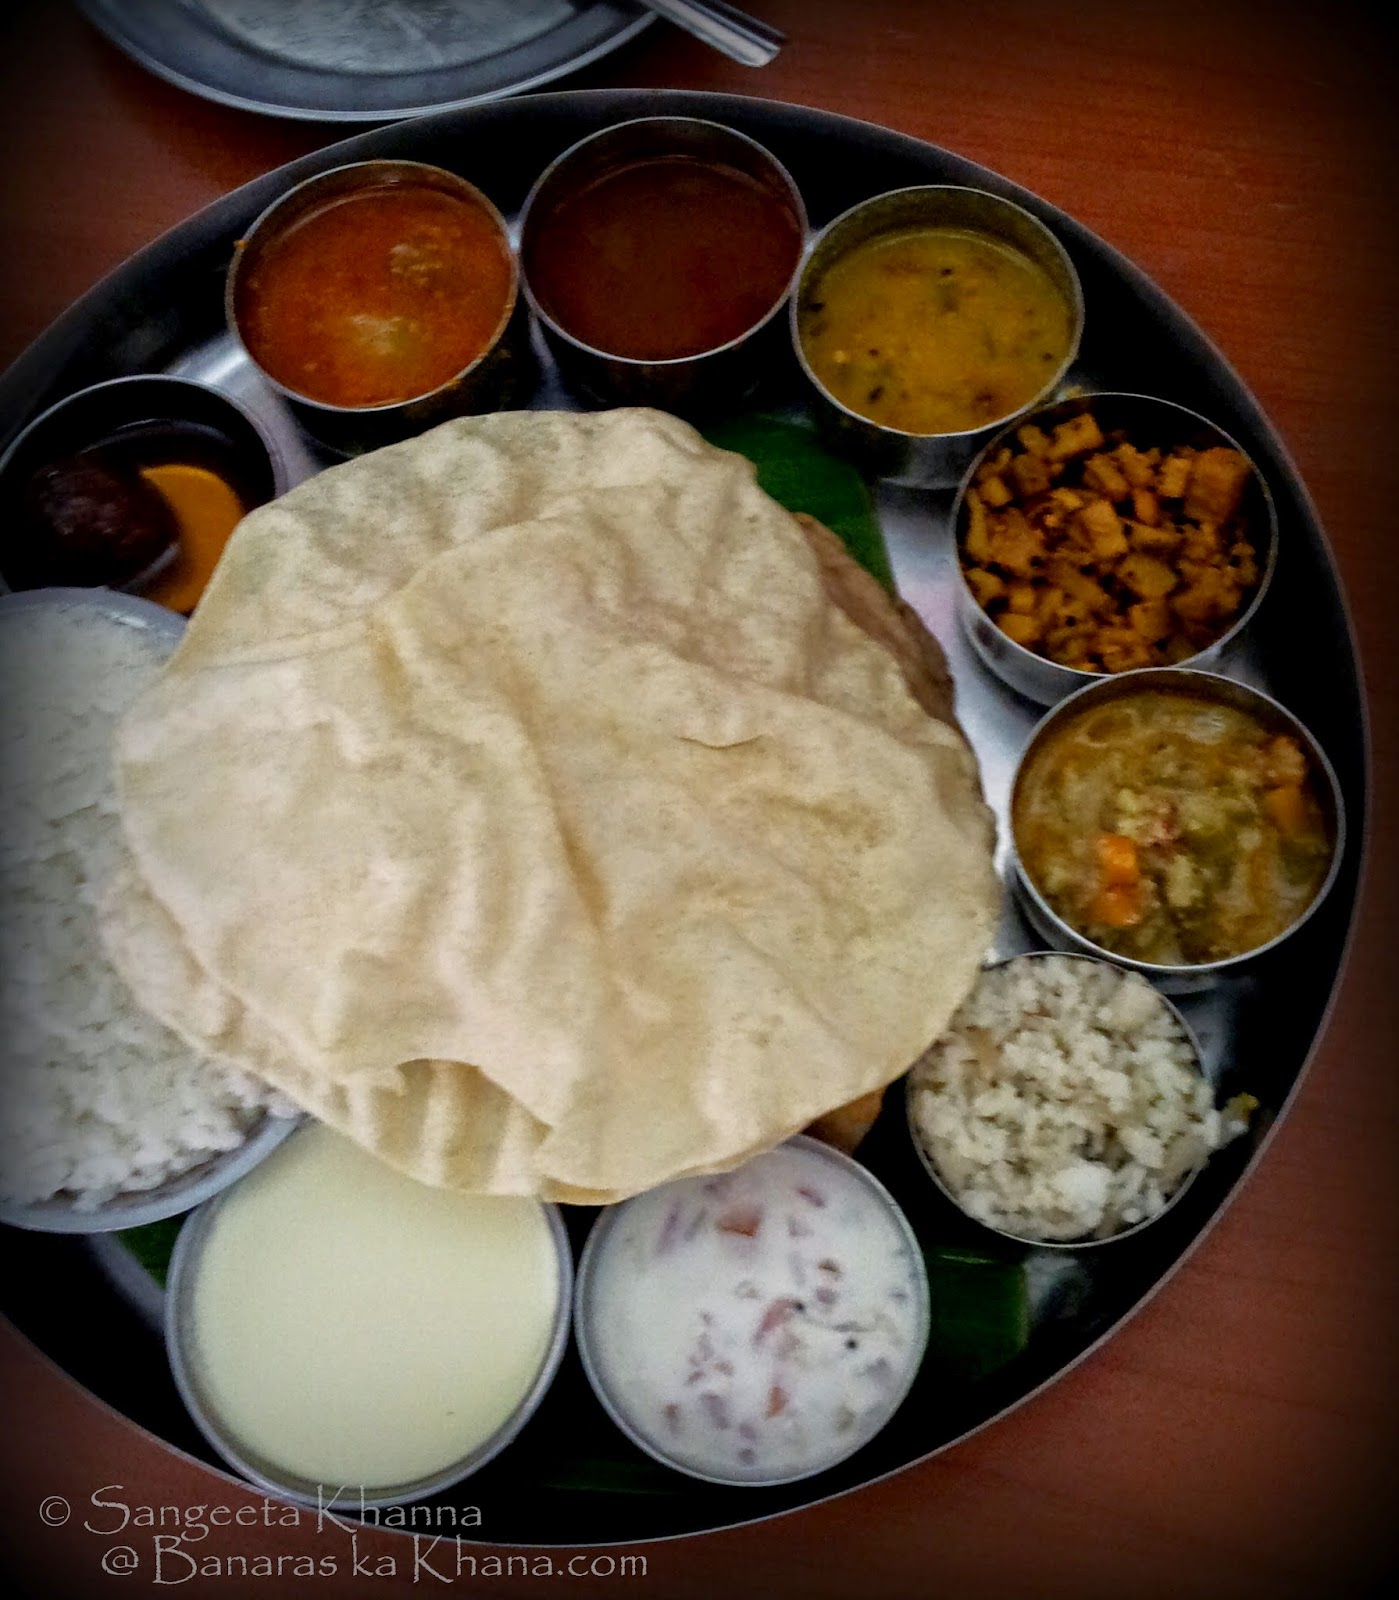
Later we tried the Mysore thali from Hotel Dasaprakash but it was not impressive. Although I liked the Ole (sooran) stir fry with curry leaves and coconut etc and another curry with coconut milk. Other elements in the thali were average.


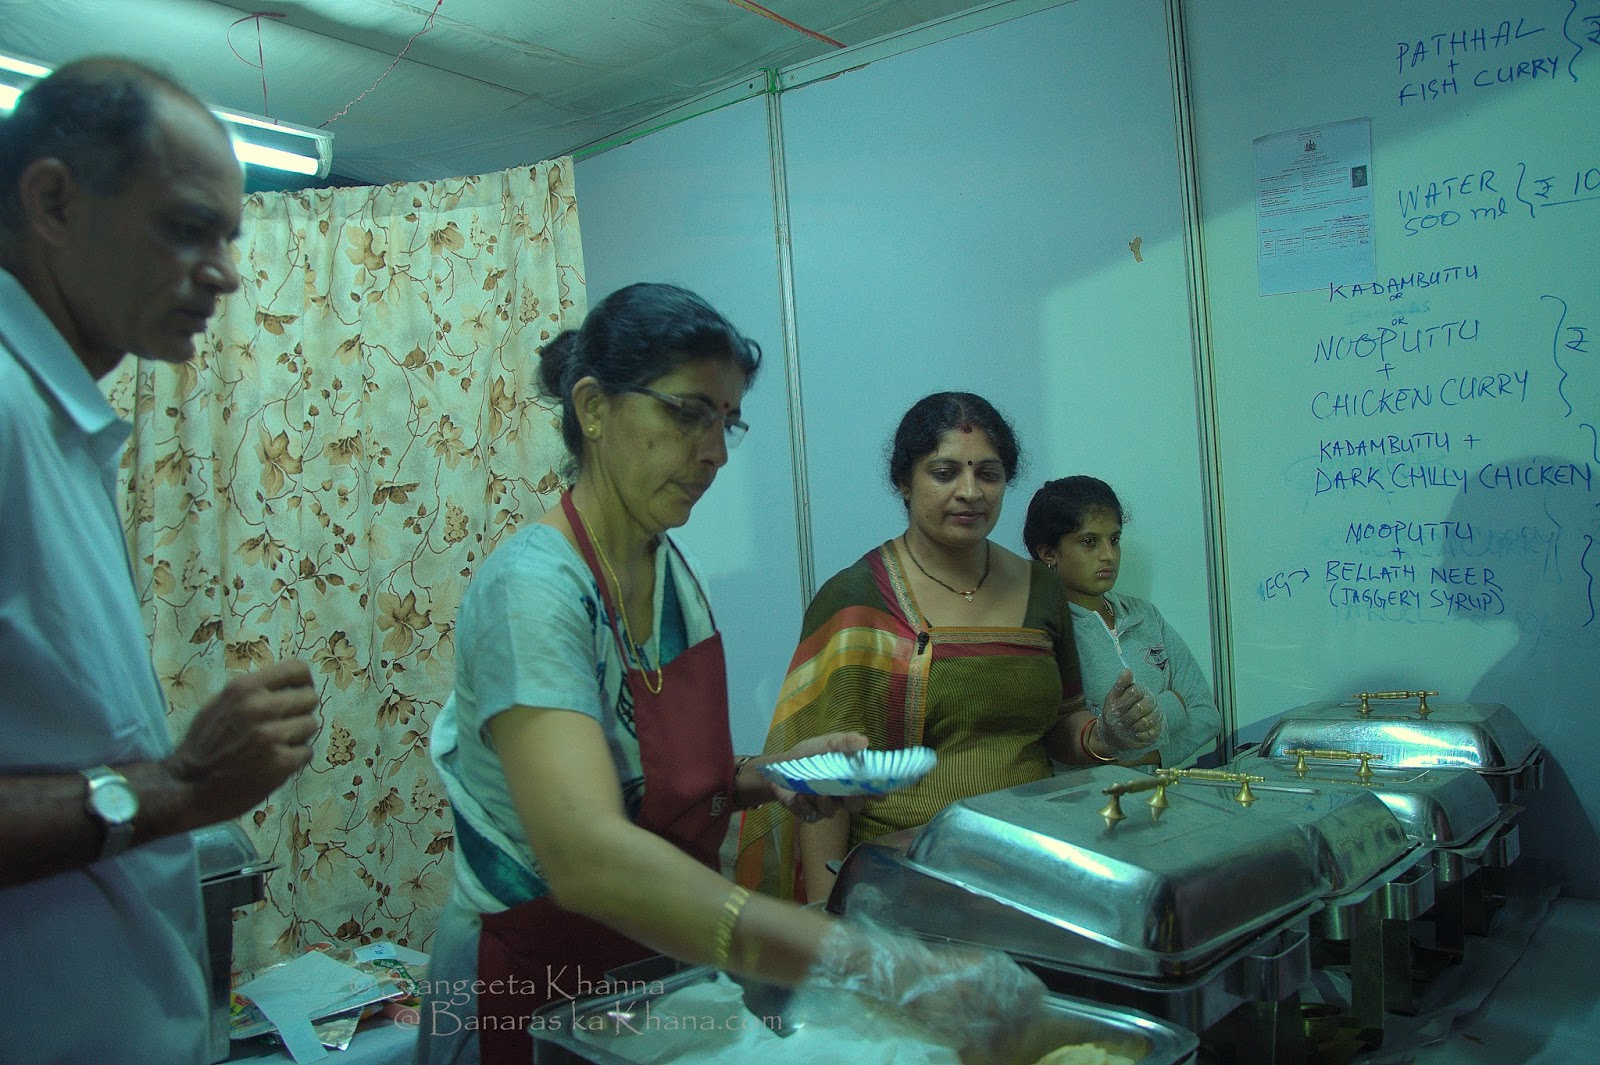
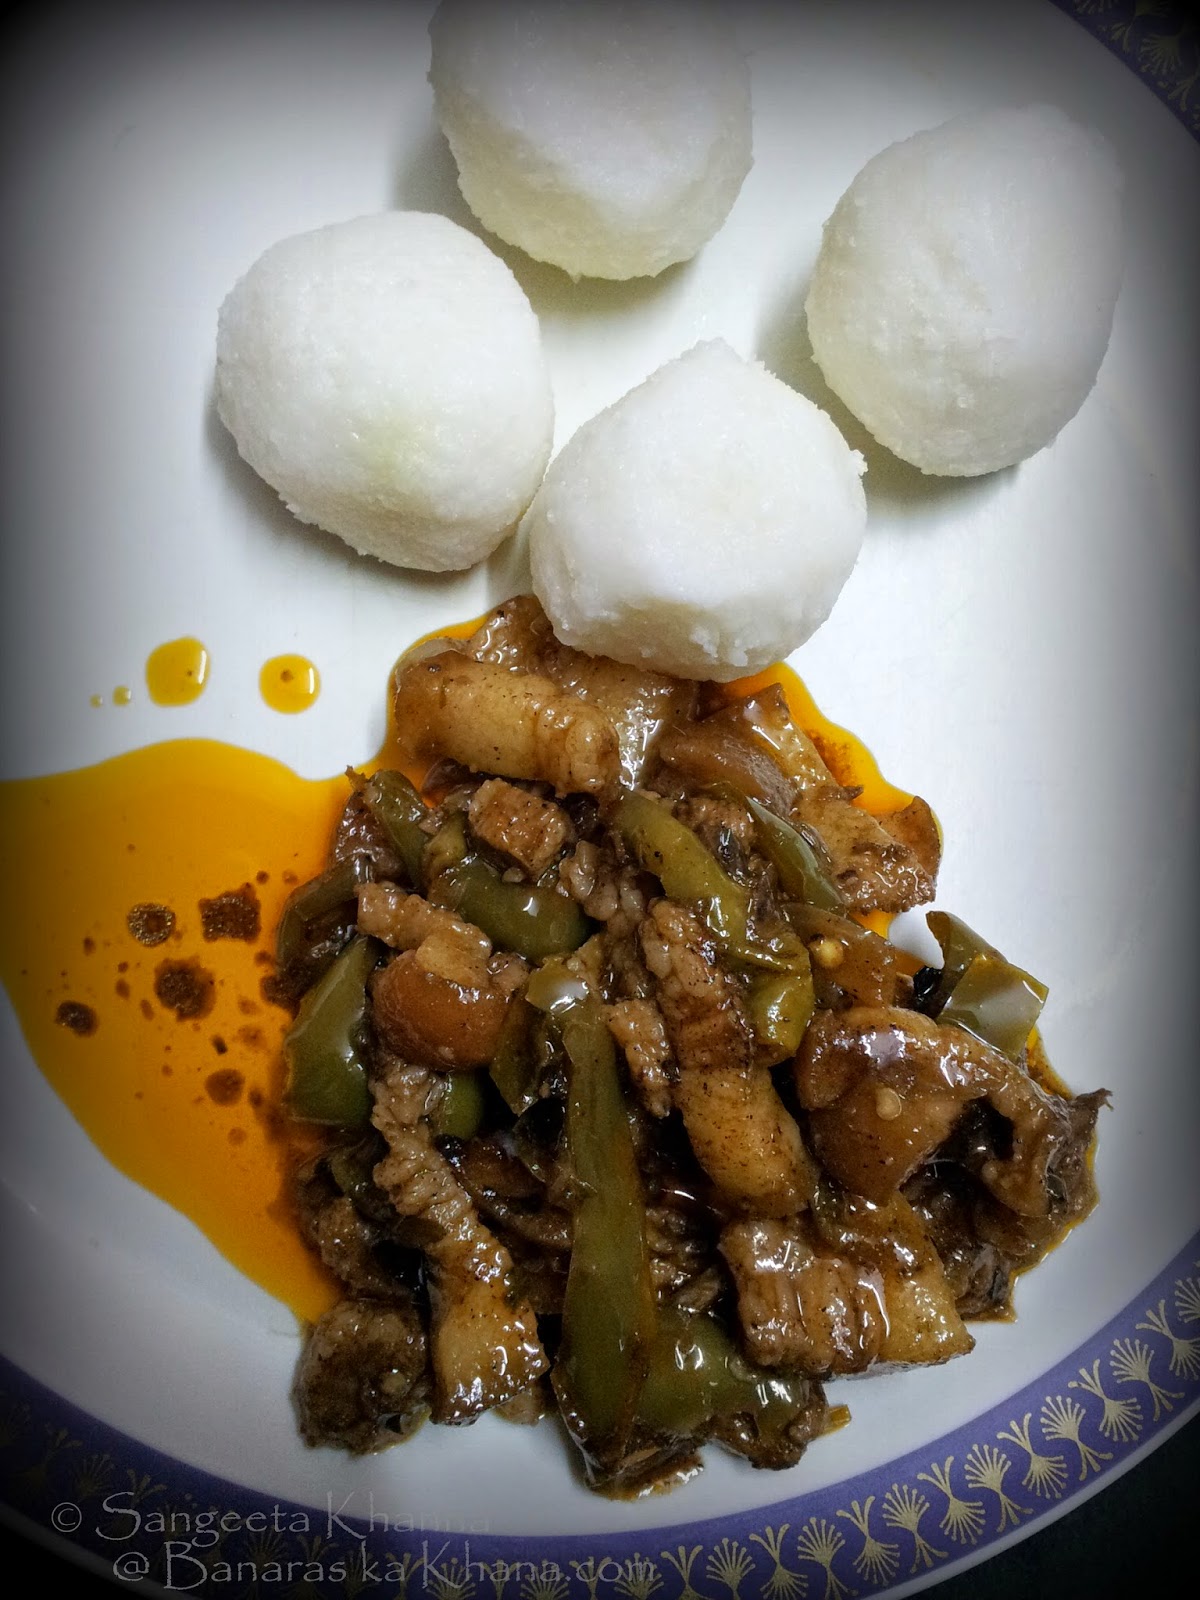
Apart from these we were lucky to witness a food festival for a week called Ahar Mela that was very close to CFTRI campus where we were staying. We found a Coorgi stall and had our fill of Pandi curry, chilly pork, black chilly chicken, Coorgi chicken curry and fish curry with Nooputtu, Kadambuttu and Sanas.This food was so good we found ourselves at this stall every other day at dinner time.


And we got the food packed for our lunch most of the times. We made the best use of this opportunity you see.


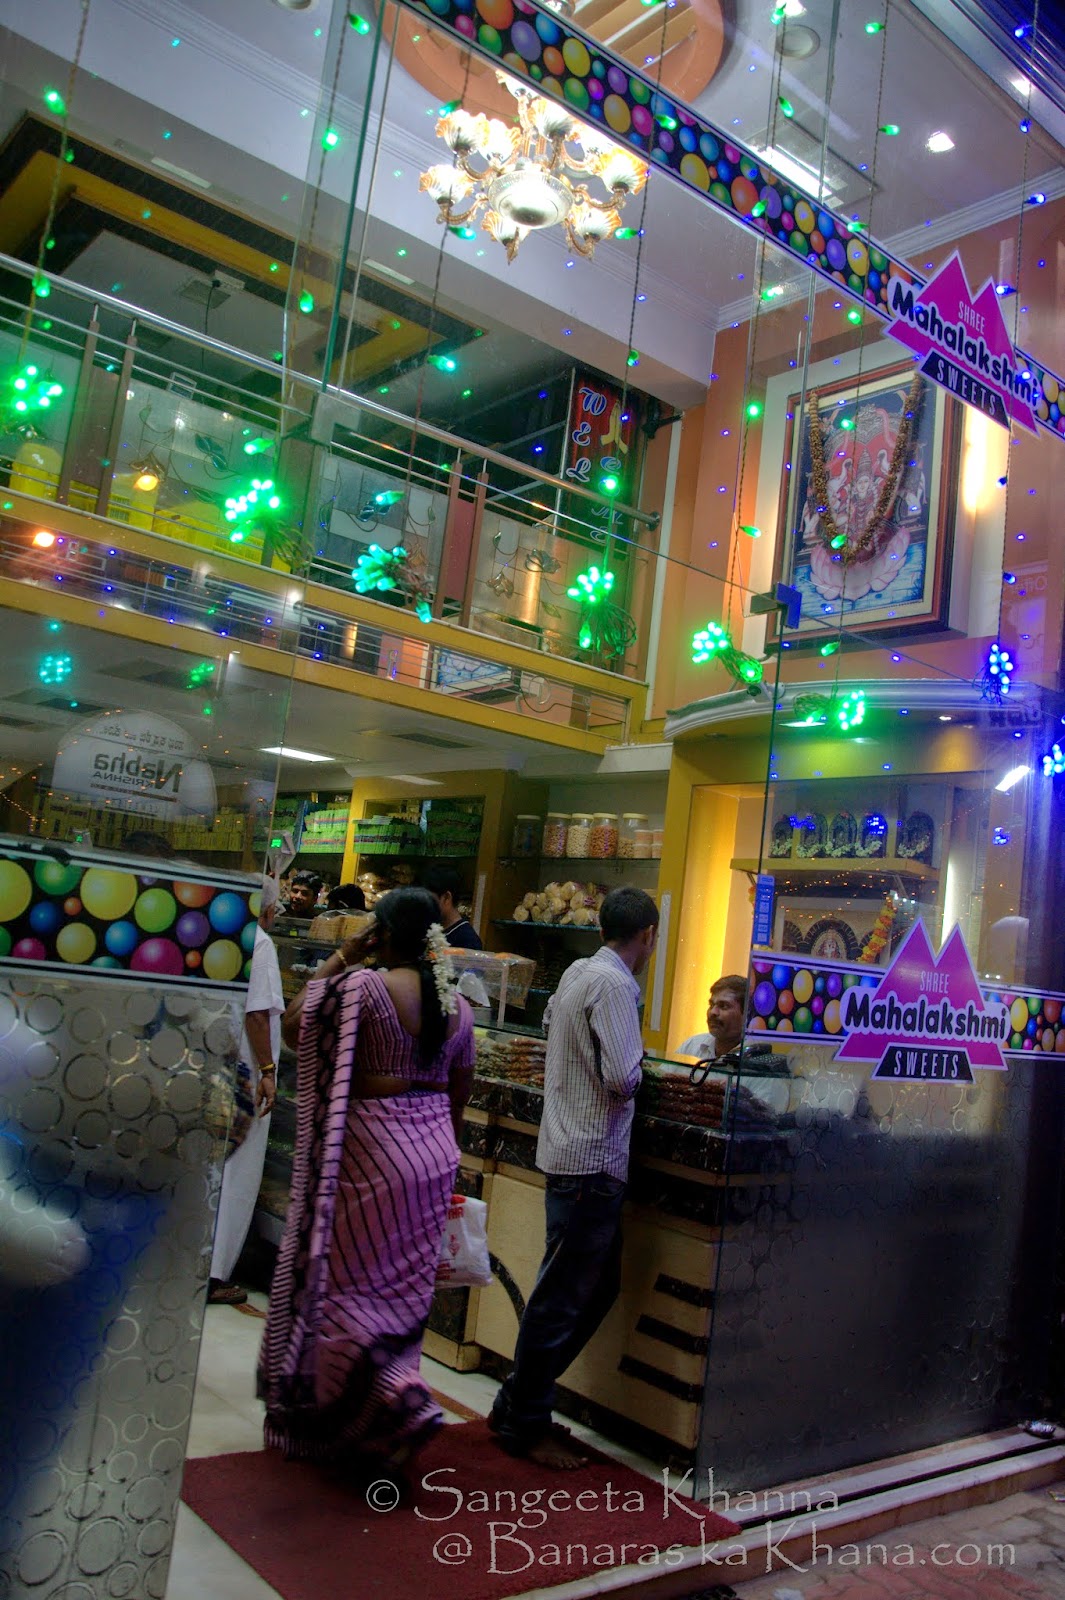
Now a thing about the Mysore paak. The sweet (mithai) that Mysore is so famous for. We tried the regular Mysore paak and Kaju Mysore paak from Mahalaxmi Sweets on KR Circle road and found it good. I actually loved the kaju Mysore paak despite being cloyingly sweet.


The plain Mysore paak from Mahalaxmi is also good, slightly brown in the middle and nicely caramelized flavours.


We had heard great things about the The Guru's Mysore paak as these were the people who are supposedly the inventors of this famous mithai but the Mysore paak was so unbelievably sweet and ghee laden that there was no flavour of caramelized besan that it should have. You get a sandy texture of sugar in this one that spoils it for me. And about 2 weeks later when I tasted both these Mysore paak from different shops, I could taste bad quality ghee used in the Mysore pak from Guru Sweet Mart.


The brown one from Mahalaxmi sweets was the same in taste, taste of good quality ghee cannot be mistaken.

Mysore is a pace to be discovered slowly I feel. One cannot feel the pulse of the city in a hurry. One can go see all the museums the city boasts of and lakes and nature parks maintained really well but to eat I would always suggest to find some or the other street vendor or one of those small eateries we see along the roadsides. You never get the real taste of a place in five star hotels, it is the street food that brings you closer to the place.


light meals : muradabadi mung ki daal aur parval ka chokha

$
0
0


Mung ki daal is the most frequent daal in my kitchen. Not only it cooks faster, I like the taste too and the simplicity with which I can dress up this daal into anything I want. I make it into a sookhi mung ki daal sometimes and add some methi sprouts to mung daal some other times. Mung ka dhokla is a recipe I repeat frequently for our evening snacks or weekend breakfasts. But the most simple thing I do with dhuli mung (skinned yellow mung beans) is just to pressure cook it and add some chopped tomato onions and have as it is. I love it as a soup, snack or a meal whatever way I need it.

This way of dressing boiled mung ki daal with just a few chopped raw onion and tomatoes is a very common way of cooking the daal in western UP, specifically Muradabad. My sister's mother in law makes this daal and everyone loves the clean flavours of this simple daal. The most wonderful thing is that there is hardly any recipe to note down. But let me warn you that the simpler recipes need to be accurate to make sense.

Recipe of  Muradabadi mung ki daal

ingredients
(2-3 servings)

To pressure cook..
split mung daal 1/2 cup (rinsed)
water 1 and 1/4 cup
turmeric powder 1 tsp
hing or asafotida 1 pinch
ghee 1/2 tsp
salt to taste

to serve..
roasted cumin powder (bhuna jeera) 2 tsp
chopped tomatoes 1/4 cup
chopped red onions or bulbs of spring onions 1/4 cup
chopped coriander greens 2-3 tbsp
chopped green chillies to taste
ghee to serve 1/2 tsp or more per serving

procedure

Mix everything listed under 'to pressure cook' and pressure cook till the whistle blows up. Switch off the flame and let the pressure cooker rest till ready to be opened. Depending on the size of the pressure cooker, the daal will be thick and done or it may be a little al dante. Let the daal simmer without the lid if needs more cooking but only till it gets thick and done, not mushy or pasty.

Add the bhuna jeera (roasted cumin) powder and half of the chopped onion and mix.

Pour the daal in individual bowls and garnish with the remaining chopped onion, tomatoes and dhaniya patta. Drizzle with ghee and serve hot.


I usually make some bharta or chokha with such simple light meals, mostly when we are home after a long travel or have eaten out a bit. Light home cooked meals serve well on such occasions but I can live on such meals even in my everyday life.

This time I had made this Parval ka chokha that I love to bits and keep repeating it till the parval season lasts. Again the recipe is very simple but needs to be accurate to give the same results.


Recipe of Parval ka chokha 

ingredients 

to pressure cook together..
parval (pointed gourd) 10 large ones (scraped and halved)
baby potatoes 2 peeled and halved
salt to taste
1/4 cup water

to finish..
chopped onion 2 tbsp
minced garlic 1 tsp
minced green chillies 1/2 tsp or to taste
chopped coriander greens 1 tbsp
mustard oil 2 tbsp

procedure 

Mix the ingredients for pressure cooking and cook till the first whistle. Let the pressure cooker rest till ready to open. Mash the boiled vegetables with the help of a potato masher or the back of a serving spoon.

Add all the ingredients to finish and serve right away. This parval ka chokha keeps well for a couple of hours at room temperature and tastes great with daal and multigrain rotis or with daal and rice meals.


Try and cook this mung ki daal and parval ka chokha together whenever you need a light meal to cleanse your body of overeating, festive eating or eating out. Or just to have a pleasure of simpler warm meals cooked at home. I assure you wont be disappointed.

Both these Muradabadi mung ki daal and parval ka chokha are one of those foods that I eat in large amounts. Often without any roti or rice to go with it. I am sure you know it already if you have been reading my blogs for some time.

Cheers.


Viewing all 257 articles
Browse latest View live